If your classes go anything like my workshops do, then you seldom start right on time. I always hate “wasting time” out of my scheduled class time, and wish I could do something to make that time more useful.
I’d really like to have something like the pre-previews content that movie theaters run; you know, the stuff with trivia games, ads, and the like that play before the house lights dim. There’s always an array of things to tell my learners about, and having that showing on the classroom projector while I do other things until class starts seems ideal.
PowerPoint to the rescue!
If you prepare a series of informational slides (when the next exam is, when the drop deadline is, what sort of cookies you prefer, etc.) it is possible to configure your slides to automatically advance, and when the end of the presentation hits, to loop around and play them all again. The two key elements are “Transitions” and “Loop Continuously.”
- First, make sure you don’t have any animations that are set to run “On Click.” If you do, those animations will not trigger.
- Next, for each slide, decide how long you want it to display on the screen.
- Move to the first slide, and click the Transitions tab.

- At the right side of the ribbon, in the “Advance Slide” area, uncheck “On Mouse Click”, check “After:” and set the time. That is minutes, seconds, and fractions of a second, so if you want the slide there for 15 seconds it must be set to 00:15.00.
- Repeat steps 3 and 4 on each slide of your presentation. Each may have a completely different time set.
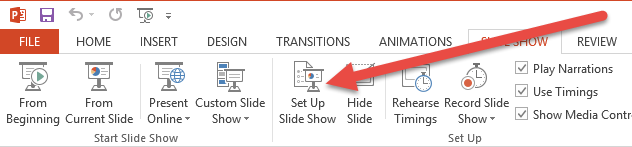
- Next, go to the Slideshow tab, and click the “Set Up Slide Show” button near the left of the ribbon.
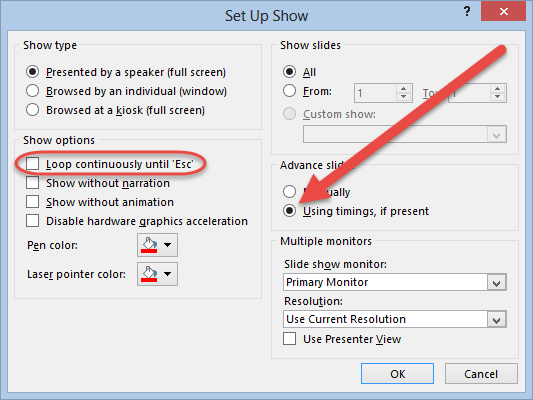
- On the “Set Up Show” dialog, check the box for “Loop continuously until ‘Esc'”, and be sure the “Advance slides” control is set to “Using timings, if present.” That way, all those times you set will actually be used.
- Now you can save your show, as you normally would, in the PPTX format.
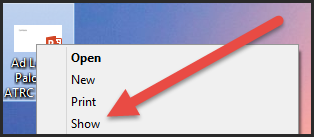
Technically you’re all done now (although you’ll want to test things BEFORE going into the classroom). But to trigger your presentation, all you need to do is right-click the PPTX file, and choose “Show” on the context menu. That should cause your presentation to open immediately into the slideshow mode, so all you would need to do then is sit back, and watch your presentation run itself.
 Now, if you’re the type who wants to use animations, even in these slides, that can be done. The trick is to make sure all your animations are set to “With previous” or “After previous,” and that none use “On Click.” Of course, the more complex your animations, the more you’ll want to test and be sure everything works as expected.
So there you have it: Self presenting slides. My plan is to start such a presentation Showing a few minutes prior to my next in-person session, and see if anyone pays attention. When you give it a try, let me know how your experience goes!
Nice power point tutorial anyway, I need this for my thesis defense presentation, thanks :D
How do you ensure the timings dont get messed up when you have set it to run automatically and the computer “hibernates”
Honestly? I hate sleep and hibernate modes on workstations (at all, but particularly on something intended as a kiosk or hooked to a data projector). I hate those so much that I try to suppress that function on any machine I have access to. Worst case scenario, if you can’t kill the auto-slumber, would be to kill the presentation (good ‘ol Escape) and restart the show. (I’m assuming that “move the mouse every few minutes” isn’t an option; I know that I never remember to do that, at least.)