
What is MyPalomar?
A: MyPalomar is your Student Center. It is a self-service web application that provides students a single-entry point from which to begin navigating to your student-related services and information.
It also presents to students in one location, the information that is important to them such as:
- Class schedule,
- Enrollment information and
- Financial information.
The MyPalomar user interface allows seamless movement between different devices that are adaptive and responsive in nature as well as accessible. From the (Old blue) to the (New red) navigation.
For Questions, issues, or suggestions email MyPalomar@palomar.edu
A: You have a few options:
- Visit H-102 at the Academic Technology Resource Center (ATRC)
- See the list of frequently asked questions below or you can watch this overview video recording Passcode: yX%M+0jt
For Student Help Videos visit https://www.palomar.edu/counseling/videos/
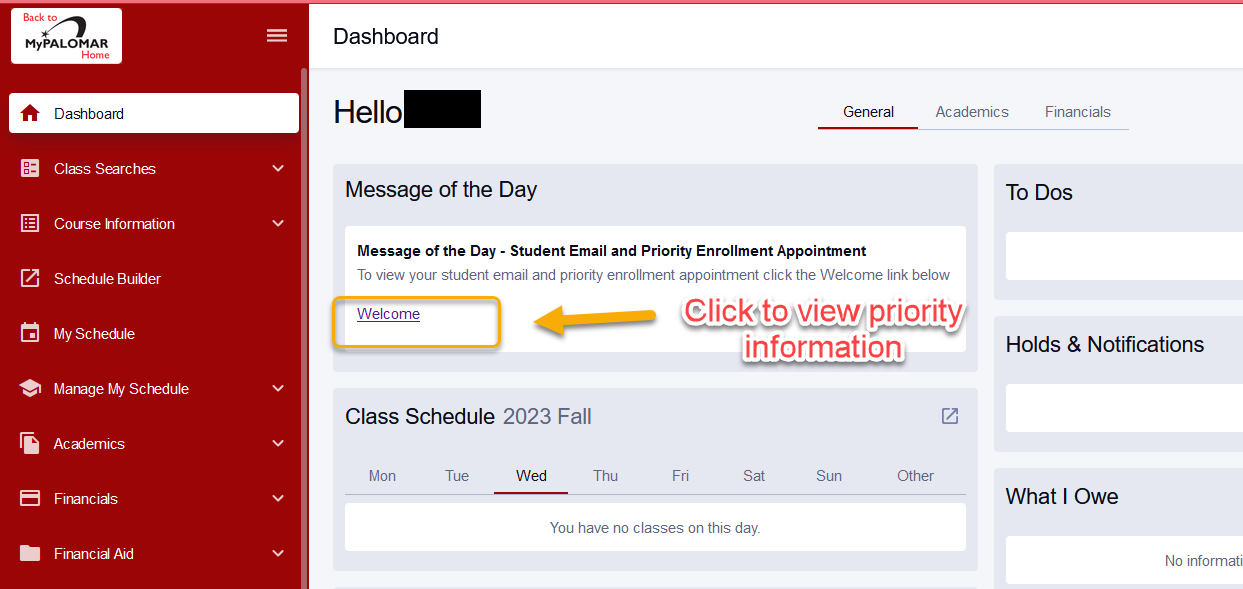
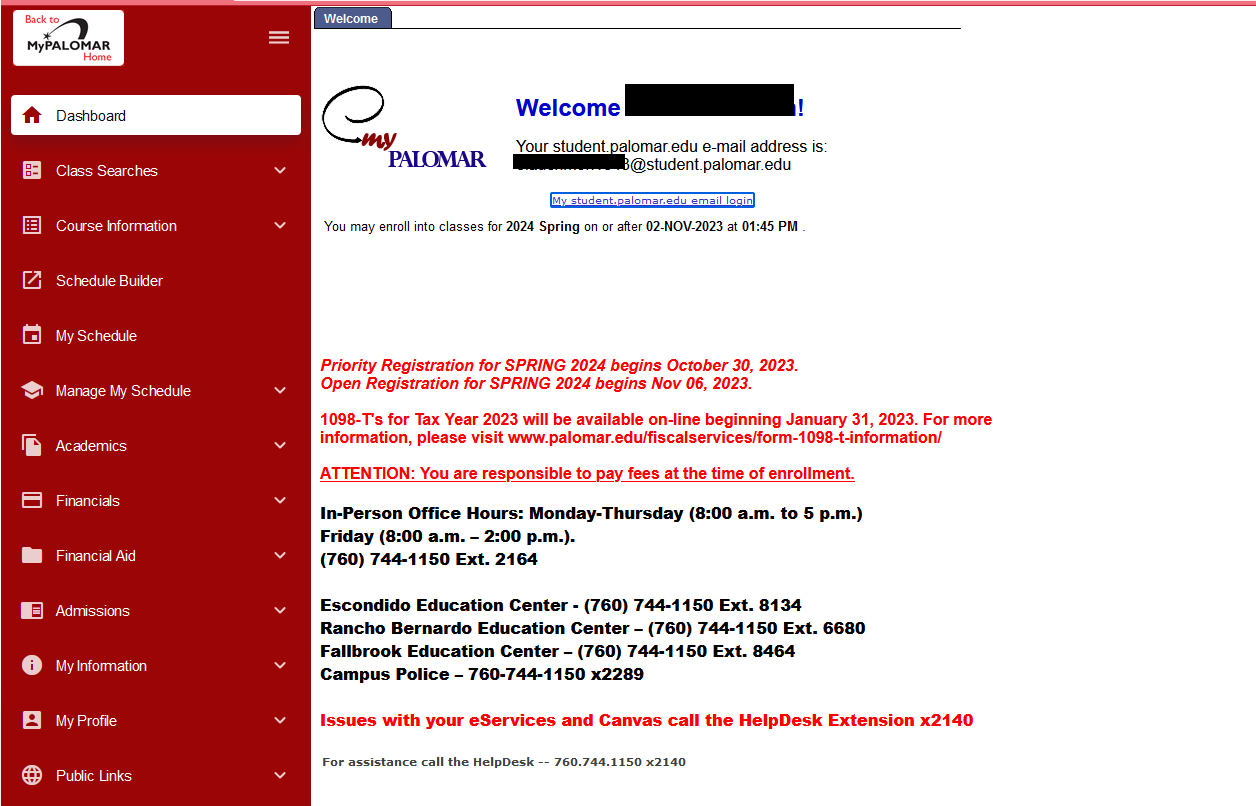
A: You will find the priority registration information under the “Message of the Day.” See screen shots below.
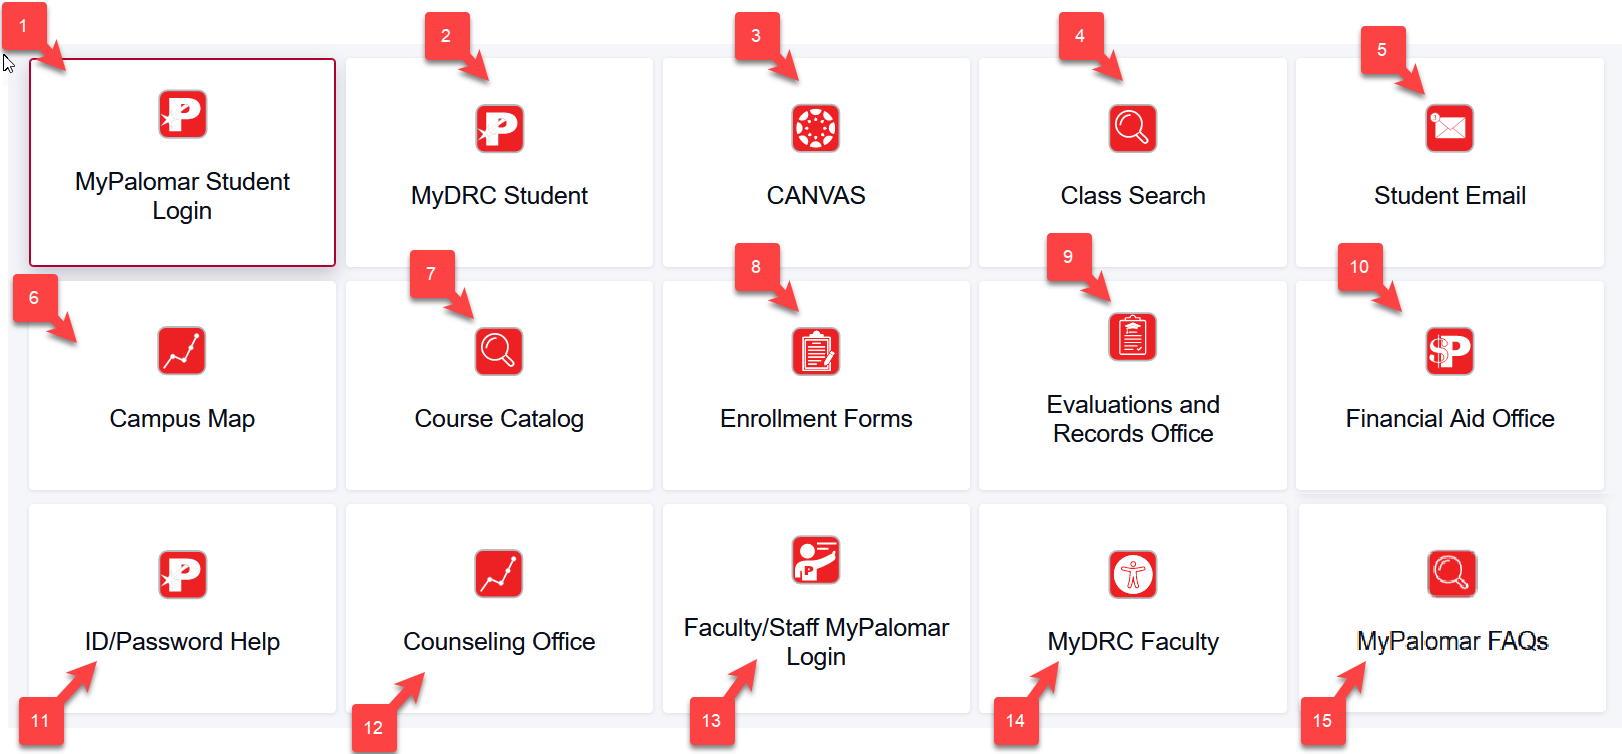
A: The Springboard is your first step to accessing MyPalomar and the many other resources available to you in one simple/central location.
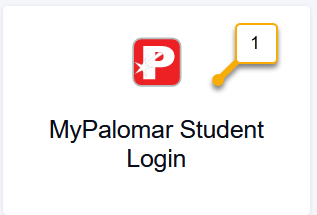
- MyPalomar Student Login: this link takes you to your student center dashboard and relevant information
- MyDRC Student: this login takes students registered with Disability Resource Center’s information for accommodation letters, scheduling a test or exam, or requesting alternate media
- CANVAS: this login takes you to CANVAS which is where your online course and online course material is located
- Class Search: this is a public link for anyone who wants to search for classes can do so
- Student Email: this link will take you to your official student email login
- Campus Map: this link will take you to a searchable map for you to identify buildings, centers, and locations you are looking to navigate to
- Course Catalog: this link takes you to the current online course catalog web page which contains the site menu for archived catalogs
- Enrollment Forms: this link takes you to the Enrollment Services forms web page
- Evaluations and Records Office: this link takes you to the Evaluations and Records web page for deadline information and contact information
- Financial Aid Office: this link takes you to the Financial Aid Office web page for all relevant information regarding Financial Aid resources, deadlines, and information
- ID/Password Help: this link will take you to a page for assistance resetting your password if you are having issues logging into the MyPalomar Student Login
- Counseling Office: this link will take you to the Counseling Office to schedule an appointment or connect with academic counseling contact information
- Faculty/Staff MyPalomar Login: this is the login to MyPalomar for employees of Palomar College
- MyDRC Faculty: this link will take faculty to their Disability Resource Center Instructor Portal site
- MyPalomar FAQs: this link will take you to a website with frequently asked questions and information
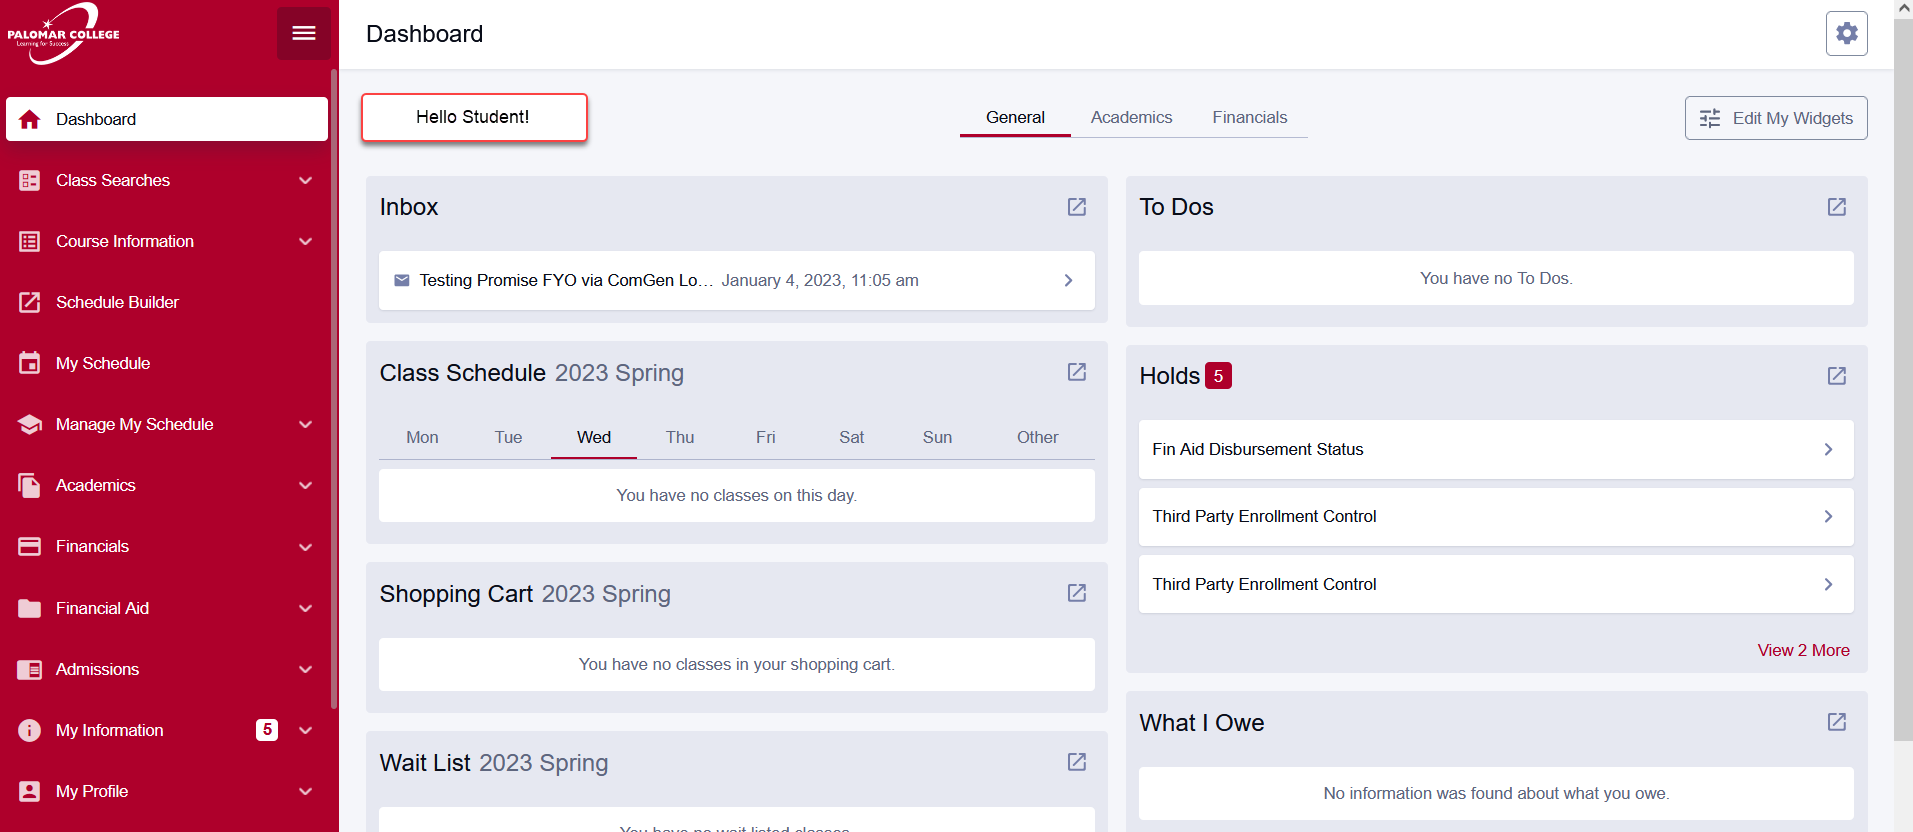
A: Yes, see below.
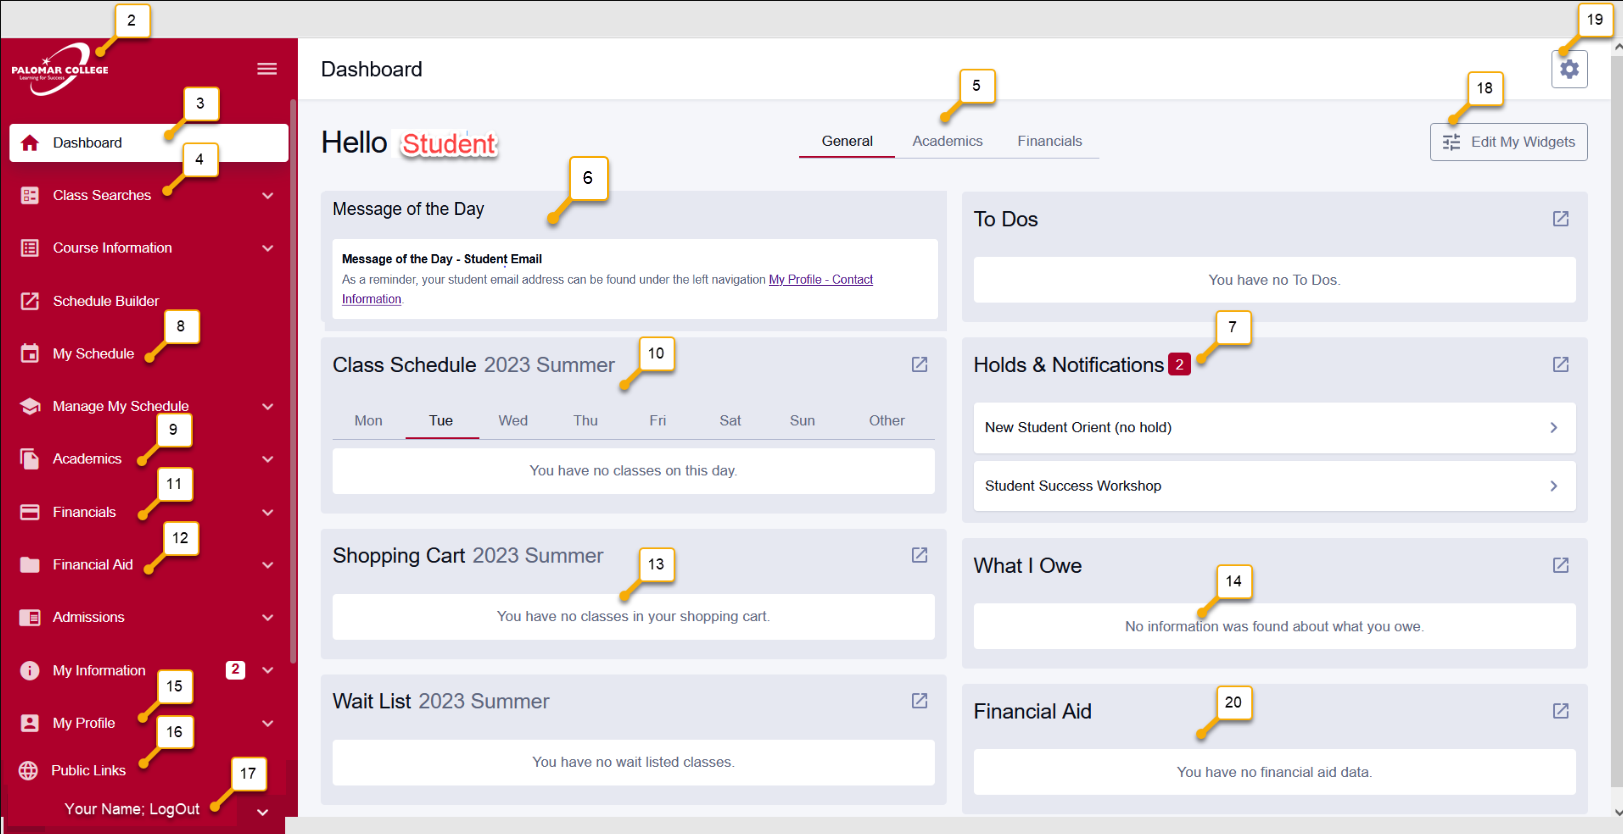
- Palomar Logo: Click here to return to the Palomar Springboard.
- Dashboard link to return to this dashboard page any time.
- Class Search: Simple/Advanced Class Searches.
- General / Academic / Financials: tabs to scroll between options to be displayed on the dashboard
- Message of the Day: This will have important messages from Palomar College if any. Always Check your Palomar.edu email inbox.
- Holds & Notifications: Any administrative holds needing to be resolved or notifications that you should be aware of.
- My Schedule: Pulls up your current schedule in a calendar view or a list view.
- Academics: This drop-down includes grades, requesting transcripts, degree progress, test scores (for placement), and more.
- Class Schedule: Clickable days of the week to see what students have each day.11. Financial Aid: FAFSA information, Exist Counseling links, Contact information for Cashier, Satisfactory Academic Progress (SAP),
- Financials: View your Account Activity, Activity Card Information, MTS Transit Pass, Palomar Promise, Payment Plan Link, Purchase Parking Permit, VA Certification, Vie 1098-T, and what you owe
- Financial Aid: Accept/Decline Awards, FAFSA application link, Exit Counseling, Contact Information
- Shopping Cart: Any classes a student has placed in their shopping cart and have not yet enrolled in.
- What I Owe: any outstanding balances due.
- My Profile: This drop-down allows students to confirm and update their address, phone, and preferred email as well as add
emergency contacts. - Public Links: Hyperlinks to parking permit information, enrollment, and admissions forms, Disability Resources, Campus Map,
and many other student resources. - Student Name of Profile: This is where you can log out of your MyPalomar dashboard.
- Edit My Widgets: This allows you to personalize and choose the widgets displayed on your dashboard.
- GEAR logo: This gives access to “About”= contact information and a “Feedback” site to send feedback to the MyPalomar
administrators to make continual improvements to this tool. - Financial Aid: summary of current and future term financial aid award.
A: There are different Class Searches outlined below.
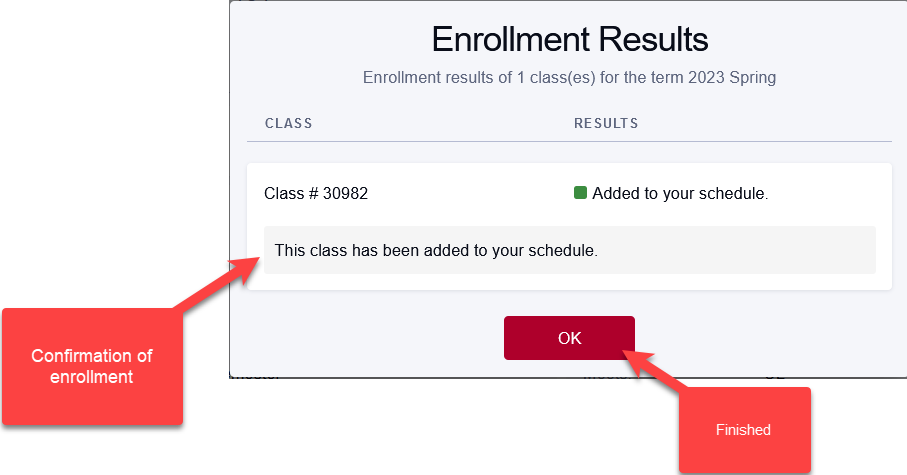
Enrollment Results View
Class Search Steps
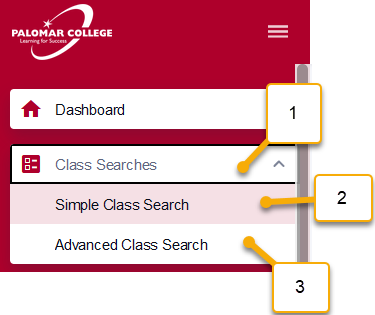
- Select the Class Searches Drop down from the left navigation
- Simple Class Search by term, credit, and subject
- Advanced Class Search with a variety of filters including Online courses. (Additional steps continue below)
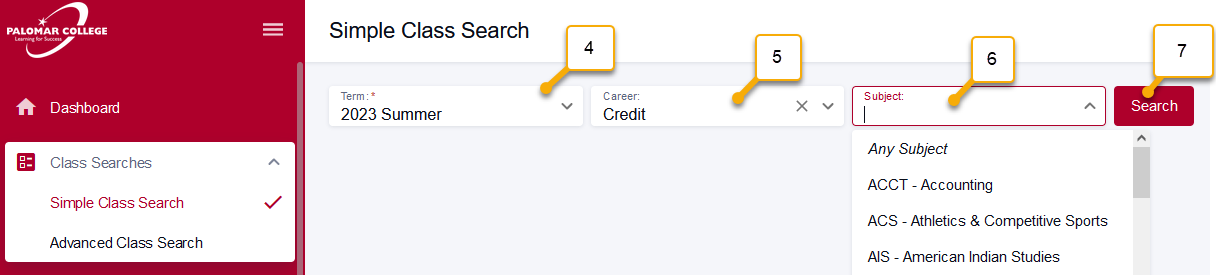
- Select the Term
- Select credit or non-credit
- Select Subject
- Select Search
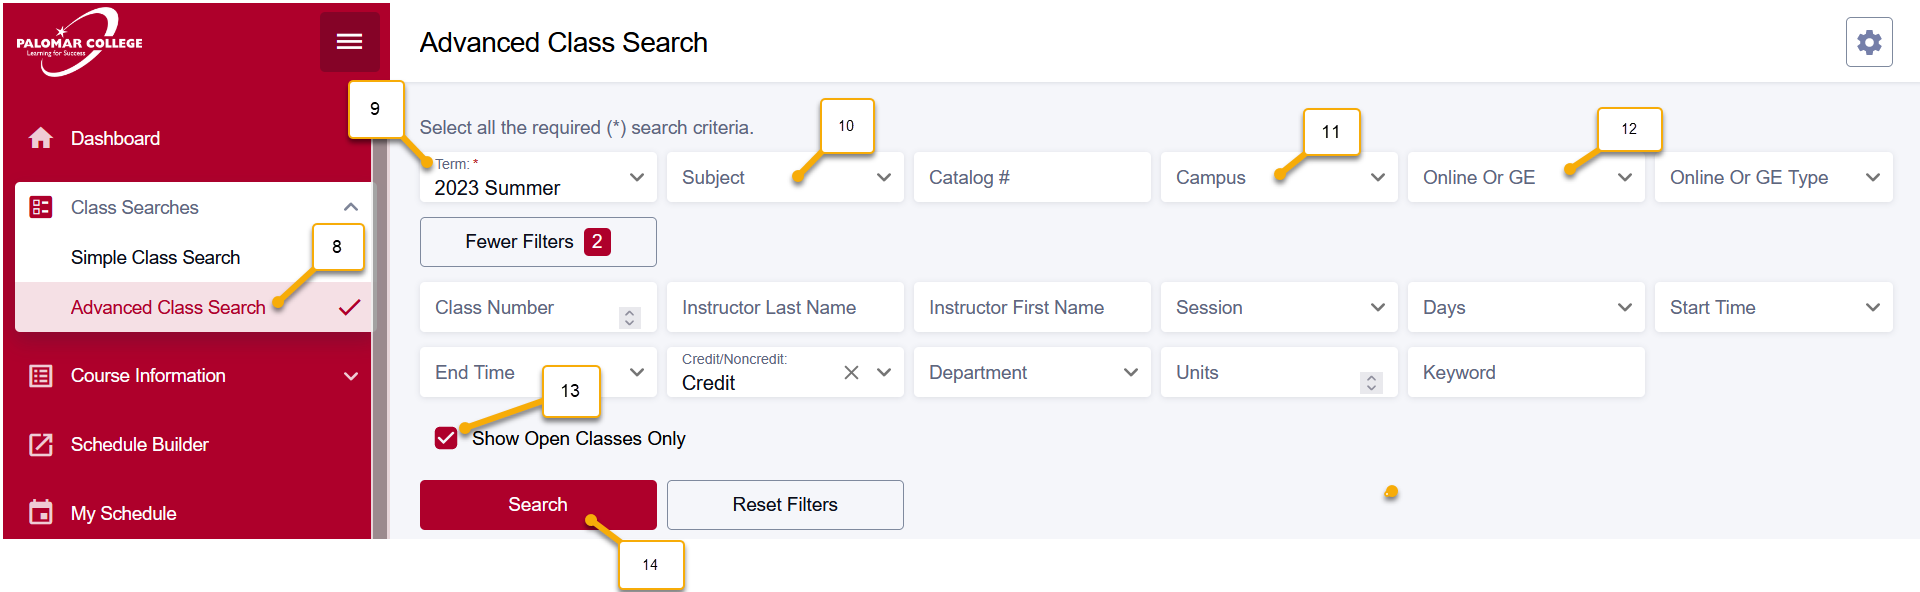
Advanced Class Search
- Advanced Class Search Option
- Term drop down
- Subject drop down
- Campus location
- Online or GE
- Show Open Classes check box
- Search
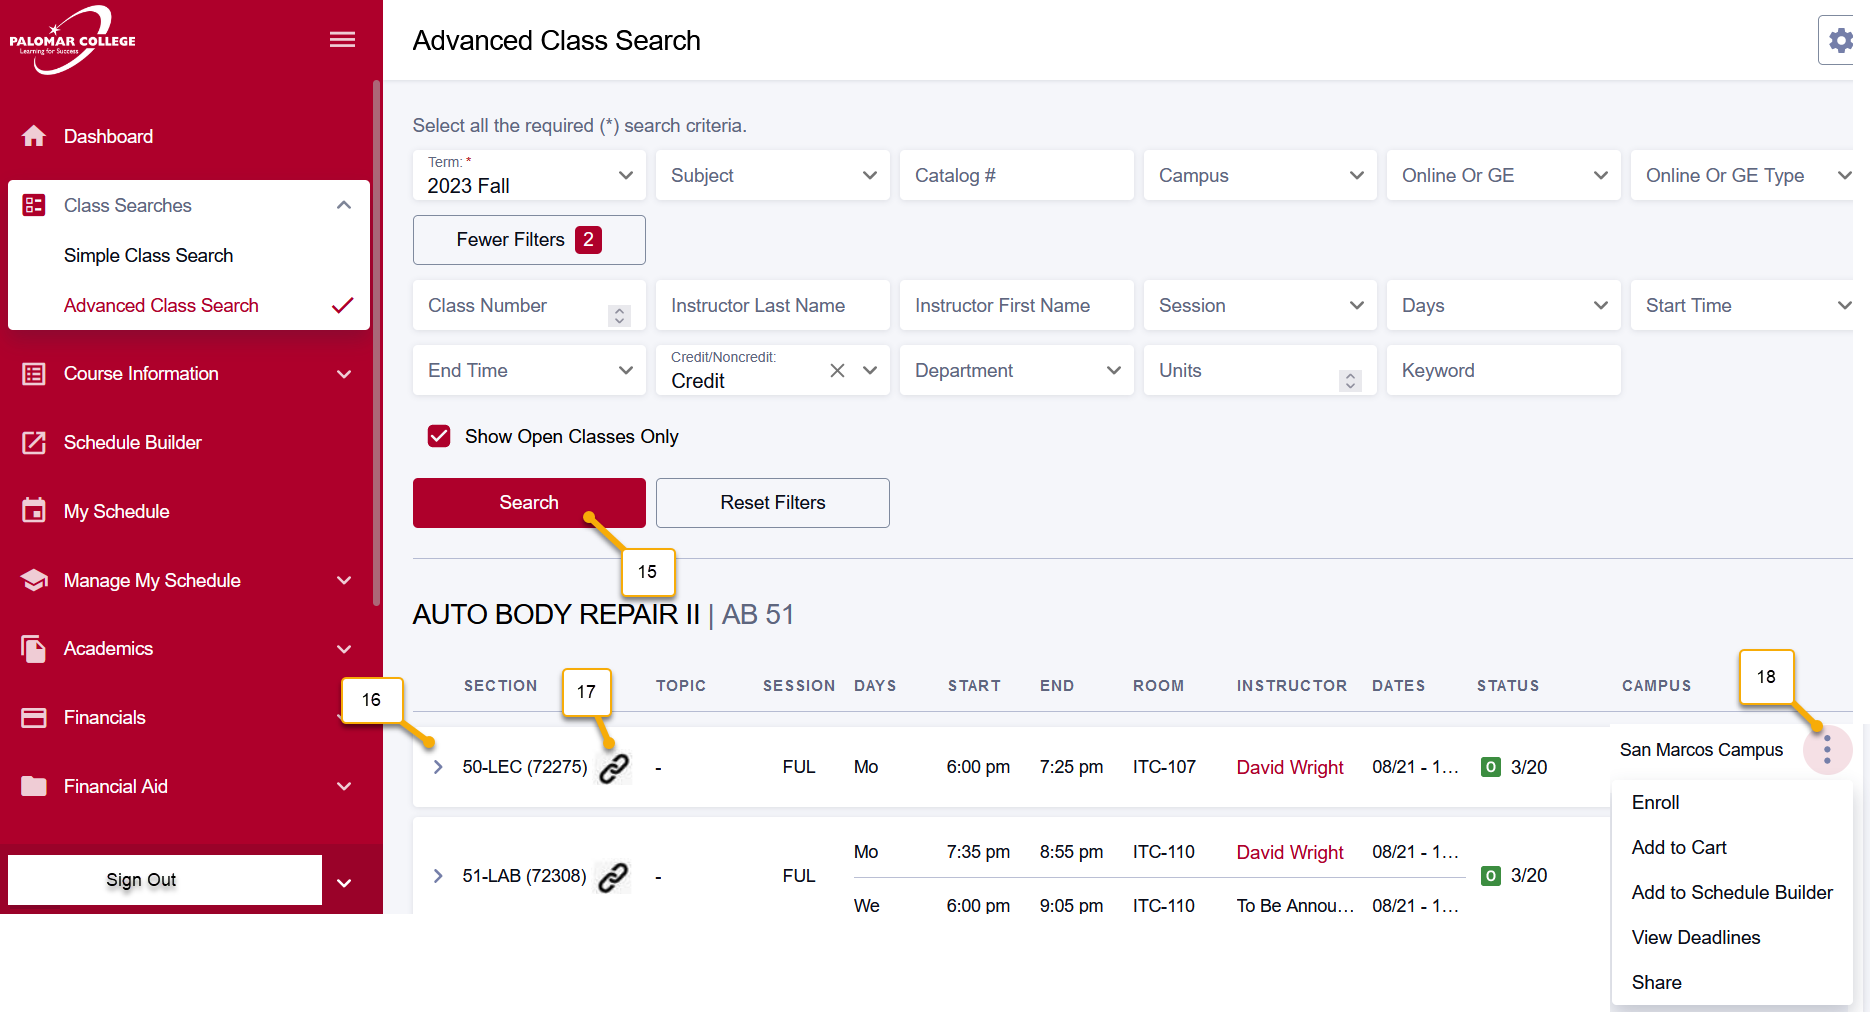
After you click SEARCH you will see a list of courses below that meet your criteria.
- Search button
- Row of courses with details about the course. Click the arrow on the left to expand
- Link icon which means this course is linked to another course.
- Three vertical dots allow you to enroll, add to card, add to schedule builder, view deadlines, and share. These same options are available below when you expand the course information
These options are visible when you expand the course row details by clicking the arrow on the left of the row.
- Share – the course information with a classmate
- View Deadlines – associated with the course
- Add To Schedule Builder – To explore building various schedule scenarios
- Add To Cart – This does not enroll you but adds the course to your cart (Course may be filled by others while you decide)

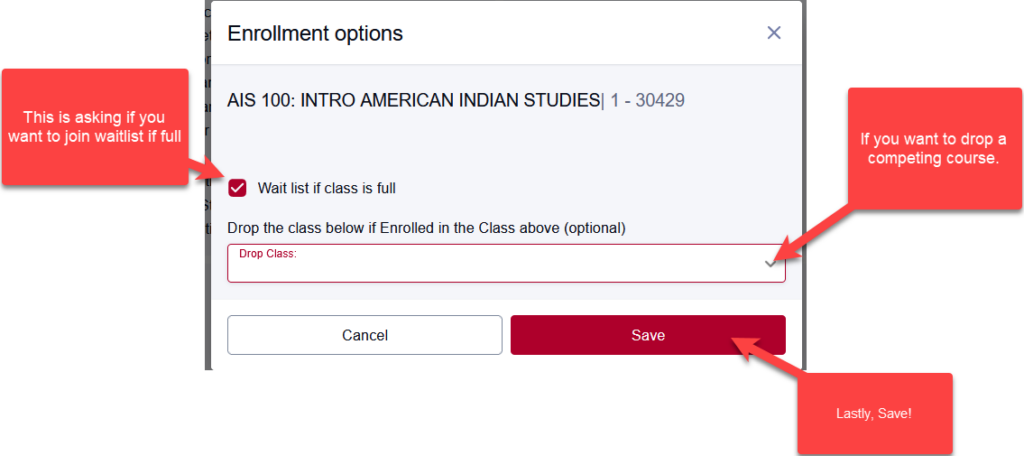
After you select Enroll:
- Check the box for “Wait List if class is full”
- If you wnt to drop a competing course chose the course in the dropdown titled “Drop the class below if Enrolled in the Class Above (optional)
- Save
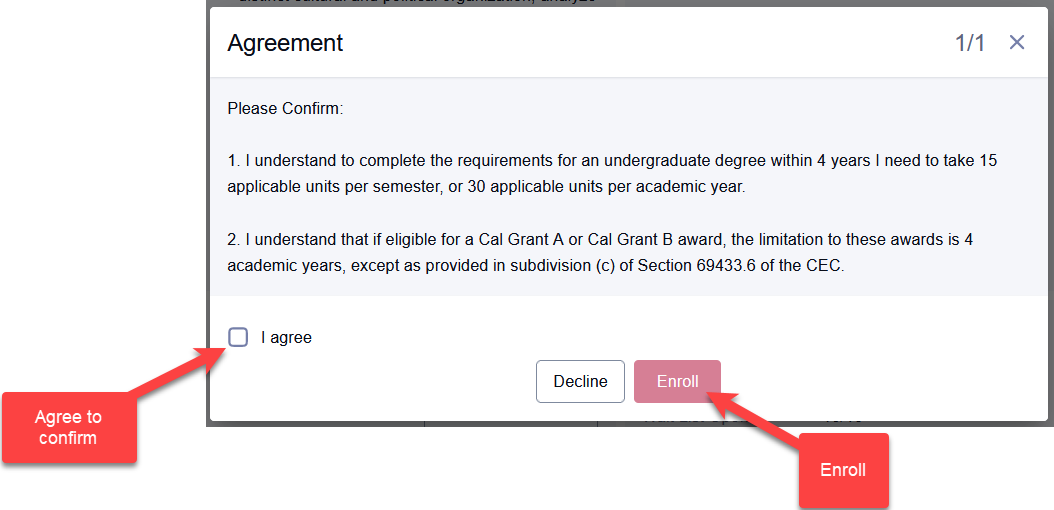
The agreement required to enroll:
- Agreement
- Confirm by checking the box “I agree”
- I understand to complete the requirements for an undergraduate degree within 4 years I need to take 15 applicable units per semester, or 30 applicable units per academic year.
- I understand that if eligible for Cal Grant A or Cal Grant B award, the limitation to these awards is 4 academic years, except as provided in subdivision (c) of Section 69433.6 or the CEC
- Enroll
- After you click “I Agree” enrollment results pop up will come up either stating “The class has been added to your schedule” or “error”
- Click OK.
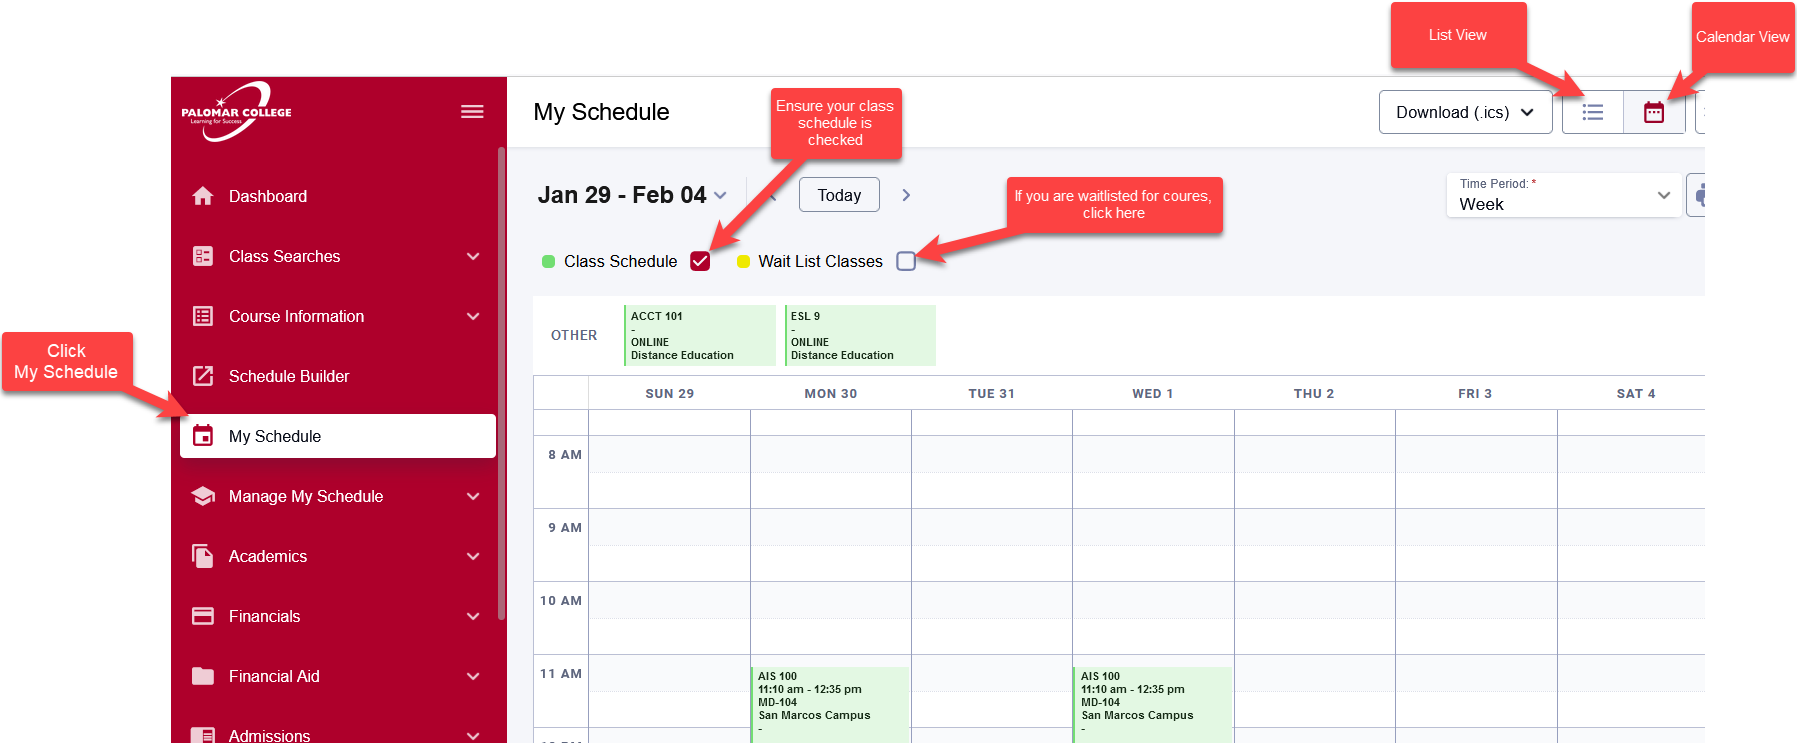
- To confirm your schedule after enrolling, click the left navigation “My Schedule”
A:
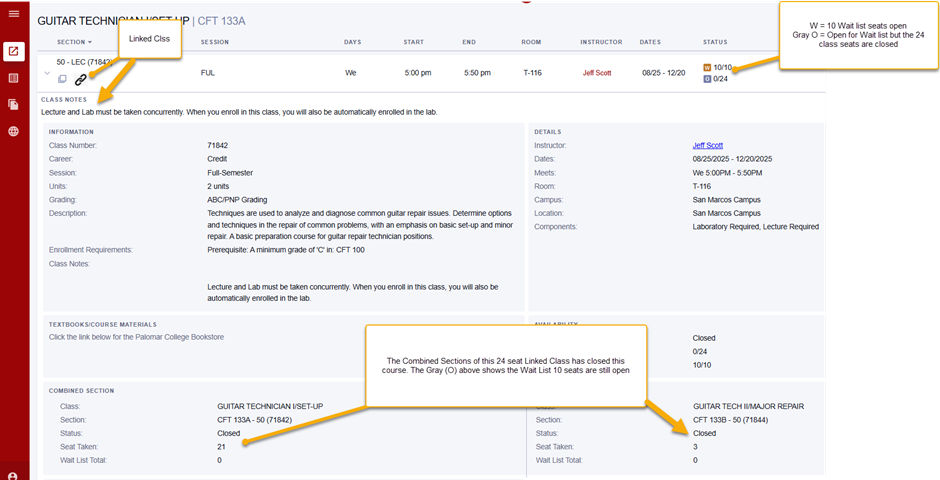
Open = Green O : For this scenario the course is open for enrollment with 18 seats open to enroll in and 10 open waitlist seats.
Closed = Red C For this scenario, there are 0 of the 20 seats available and no waitlist seats available.
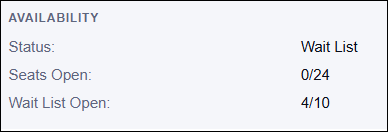
Waitlist = Orange Waitlist seats open.

For this scenario, there are (0) open seats but 4 waitlist spots a student can sign up for.
Linked Classed = There are two classes linked together for a combined Section.

Gray O = Seats Filled & Waitlist Open

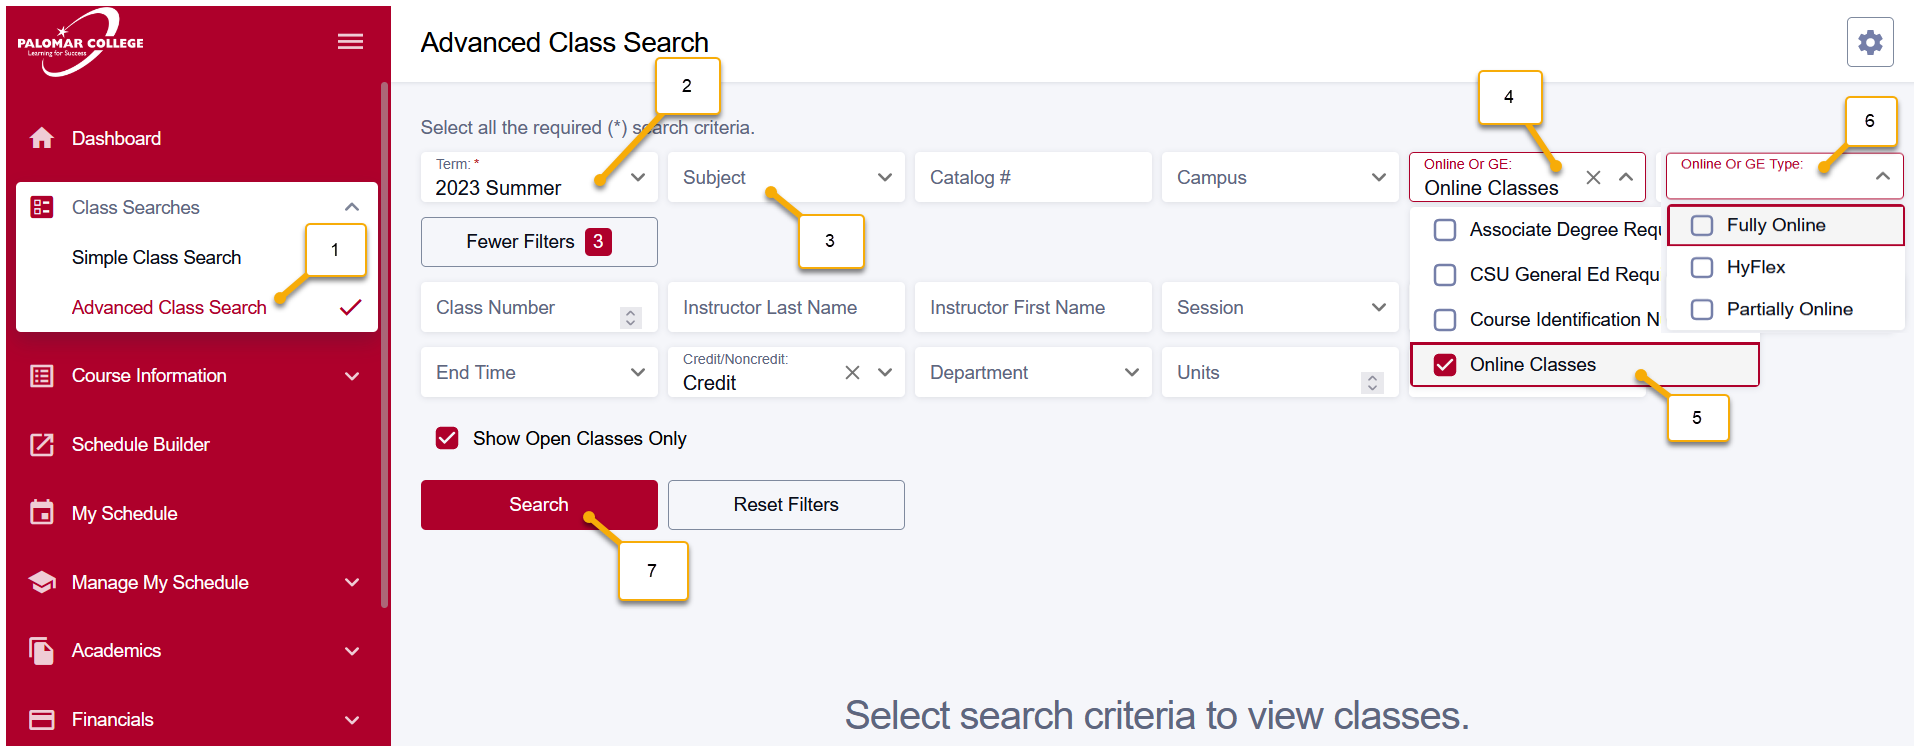
A: Follow these steps to search for an online “distance education” course.
- Select Advanced Class Search on the left navigation
- Select the Term you are looking for courses in
- Select the Subject you are searching for
- Select the Online or GE menu dropdown
- Select the Online Classes box on drop down
- Select the type of online class you are looking for (Fully Online, HyFlex, Partially Online)
- Select Search
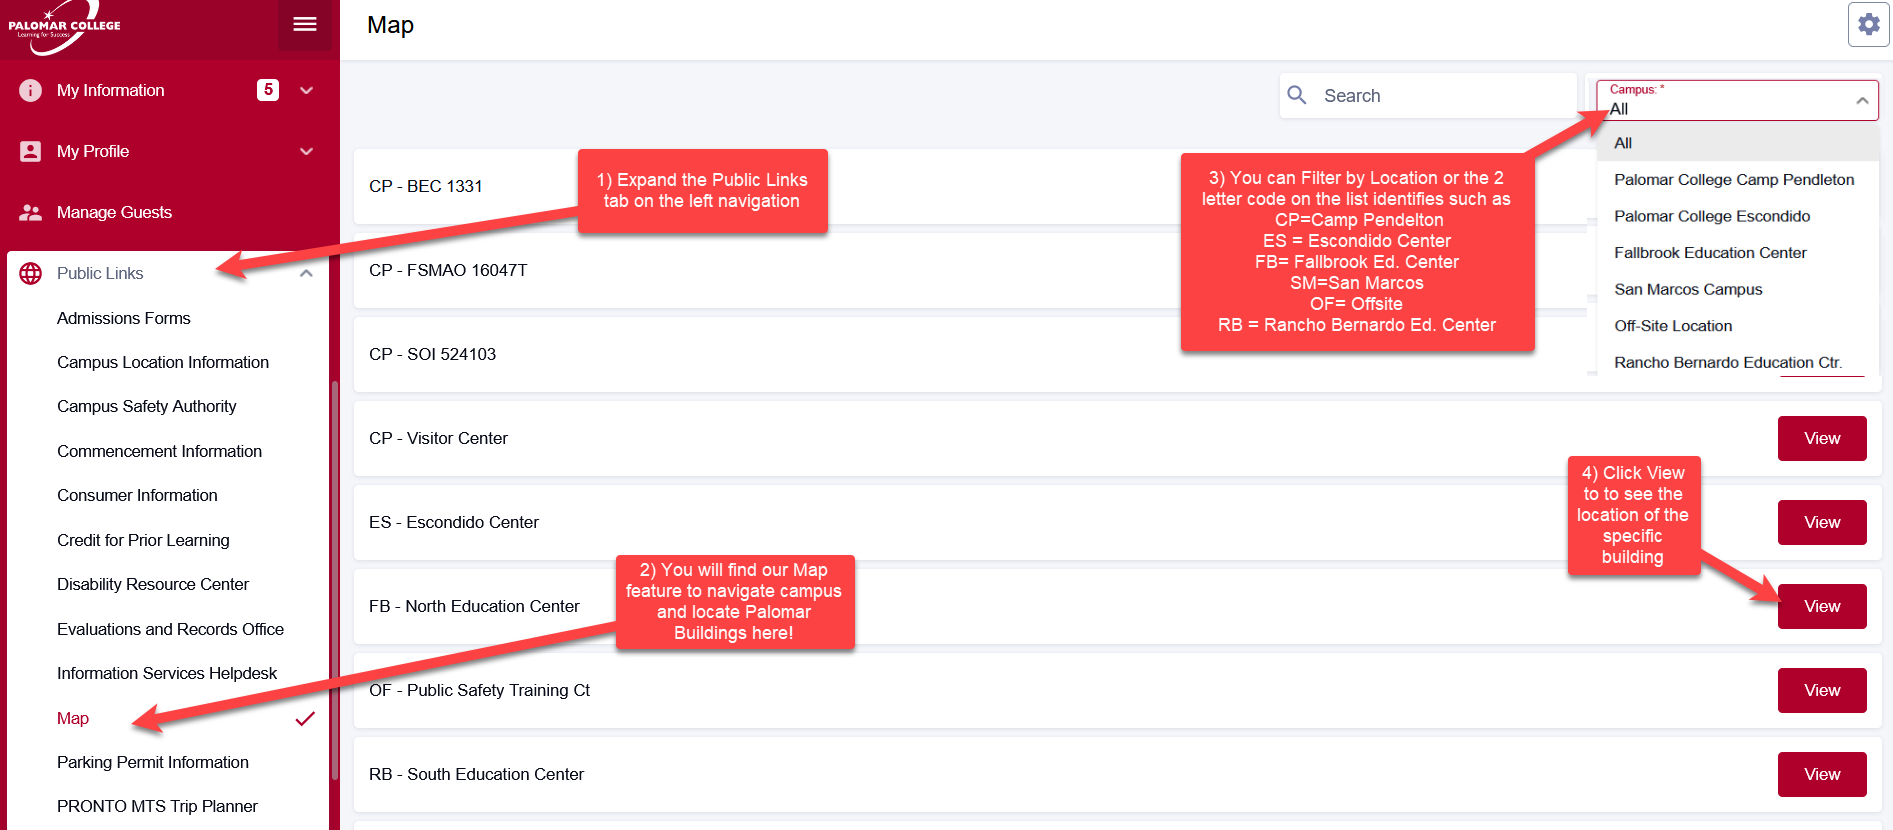
A: The Map tool is located under the Public Links at the bottom of the Left Navigation.
- Expand Public Links on Left Navigation
- Select the Map link
- Filter by Campus / Education Center if needed
- Click View (steps continue below the image.)
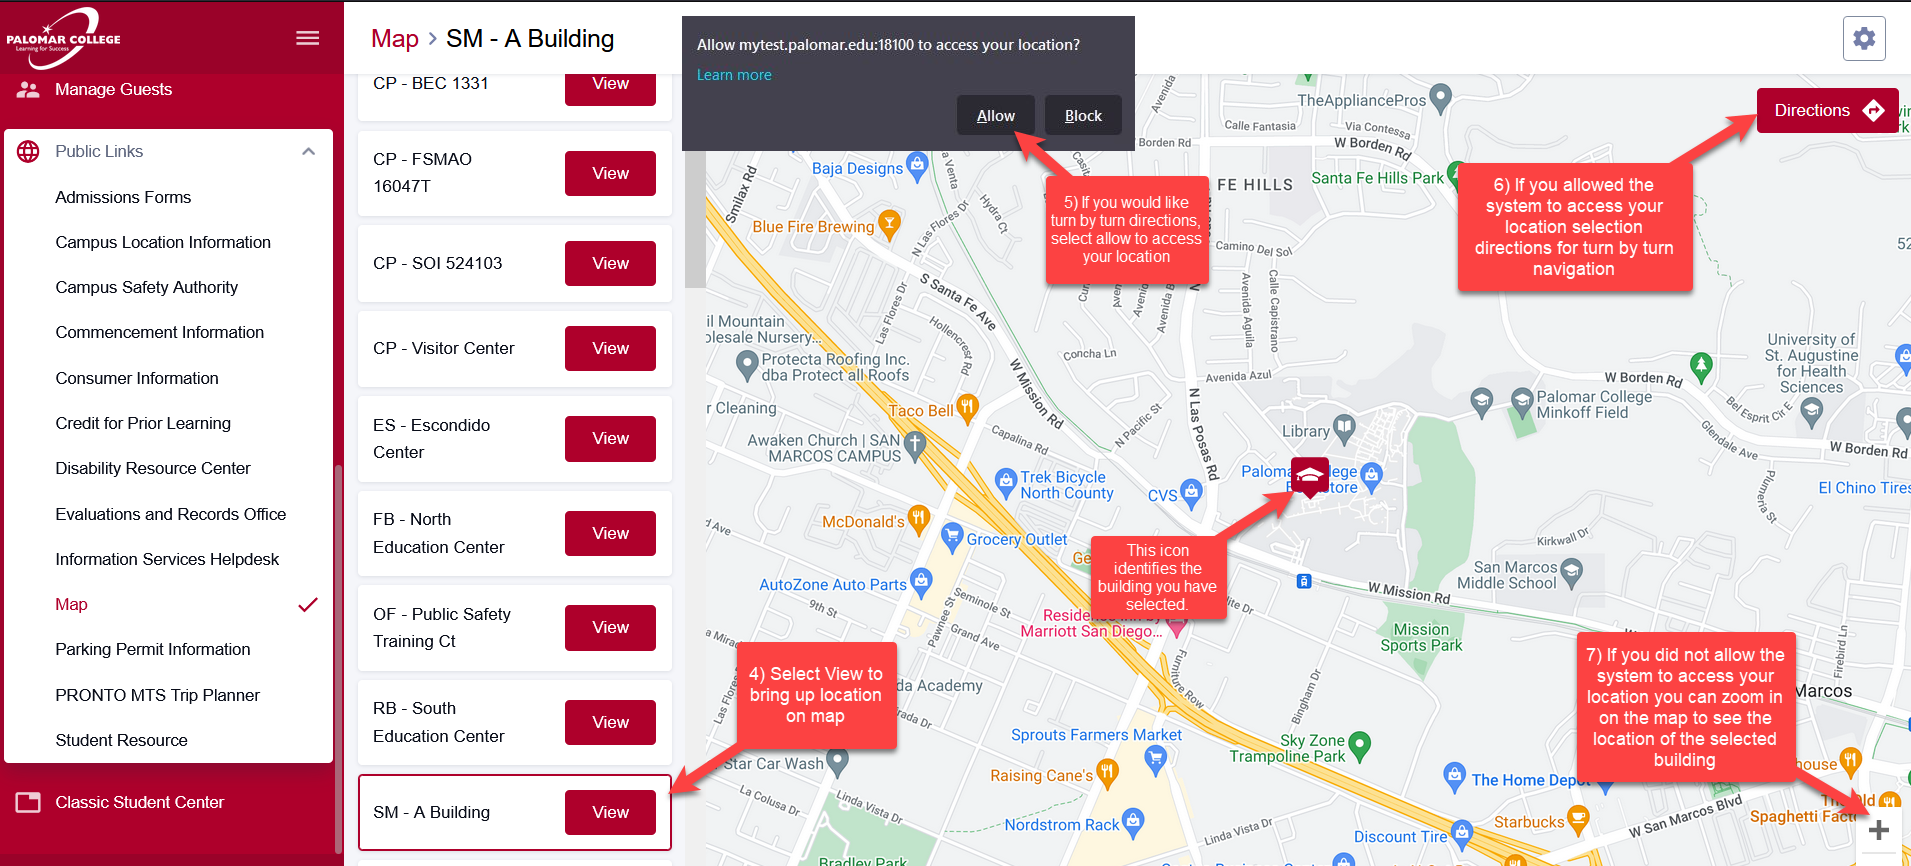
- A gray pop-up may appear in a black box. If you would like directions from where you are at to the desired location you’ve selected, click (Allow)
- After you allow and click (View) a visual map will appear with “Directions” in the top right corner of the screen. Click (Directions) to get navigational directions from where you are to your desired location.
- Or you can zoom in on the map to see the building location visually without directions.
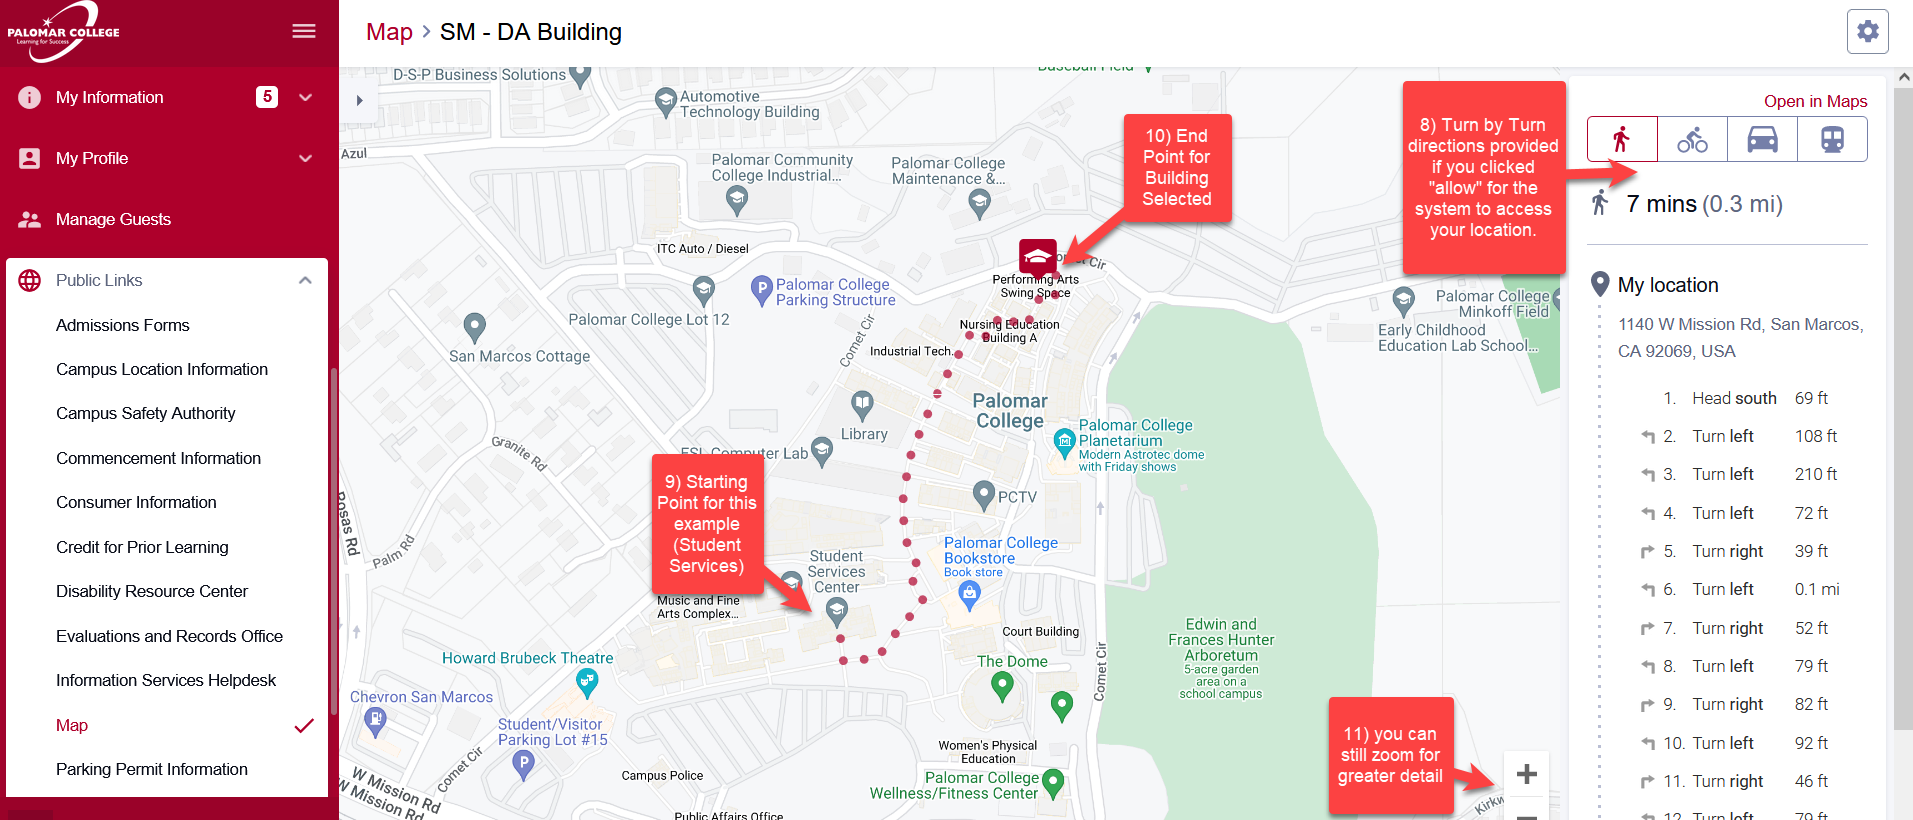
- If you selected to allow the system to access your location and you selected “Directions” on the top right of the screen, the following will appear based on the building you selected. Turn-by-turn directions are provided and can be navigated between walking and driving depending on the distance from your location. For this example, I looked up the DA building from my office in the Student Center at the San Marcos Campus.
- Starting Point if you selected to allow the system to access your location
- End Point of the building/location you selected to (View)
- Zoom in button for greater detail
Additional information about each location.
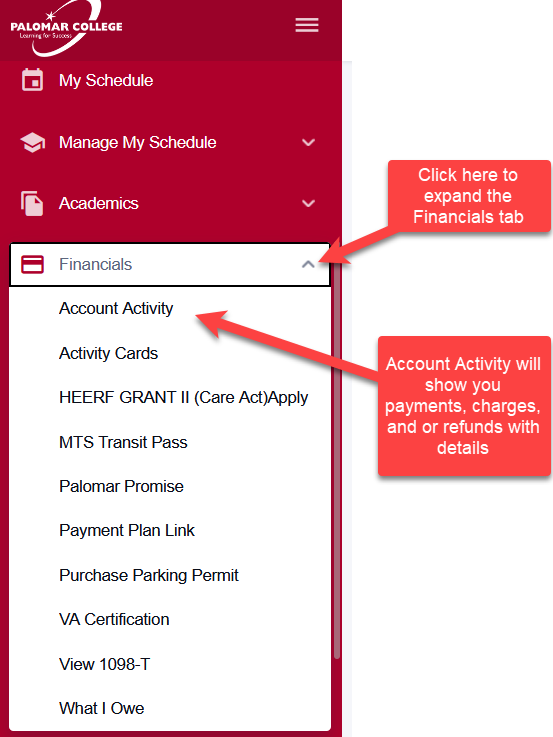
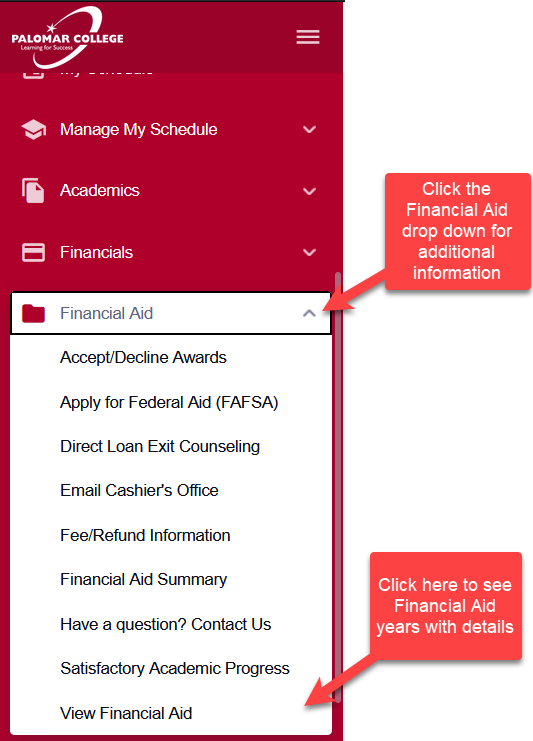
A: For information related to your Financials and Financial Aid, click the left navigation links illustrated below.
- Click the Financial Aid drop-down for additional information
- Click on the View Financial Aid option to see Financial Aid years with details.
- Click the Financials drop-down for additional information
- Account Activity will show you payments, charges, and or refunds with details
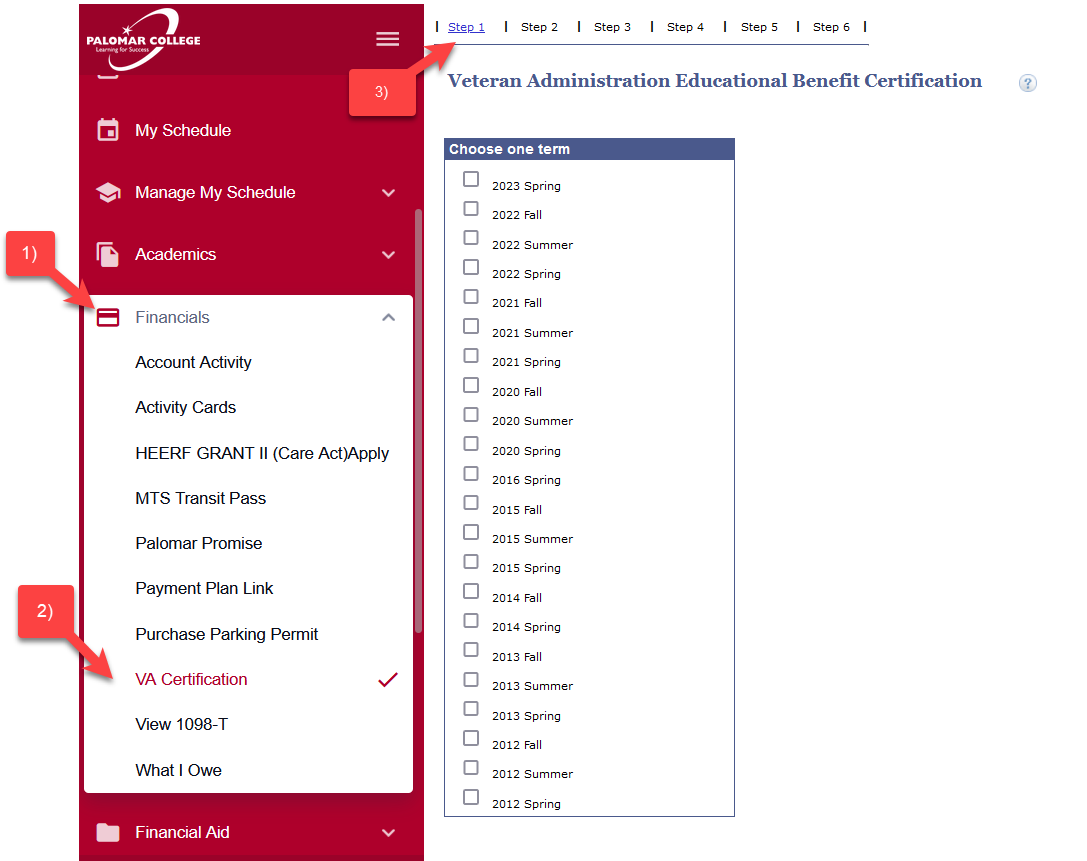
A: If you are eligible for this feature, you will have access to the “VA Certification” link on the left navigation under the “Financials” drop-down link.
- Financials Tab
- VA Certification Link
- Follow each step and work with our Veterans Services office for any questions or additional information.
A: Information Technology Services at Palomar Community College District. See Below For Technology Resources, Guides, and Information for Students
Change/Reset Student Password
Student Email
Canvas
How to Print -Student netZcore Cloud/BYOD Printing
- How to Use the Student netZcore CloudBYOD Printing System
- How to Print Using the Student netZcore Printing System
- How to Add Funds to Student netZcore Printing System
Virtual Computer Labs (Information and Guides)
- Virtual Computer Labs and Software (description)
- Virtual Computer Lab Access for Students (How to access virtual lab)
- Virtual Mac Computer Lab Access (How to login to Mac labs)
- Virtual Mac Computer Lab Access with Audio (How to enable audio in Mac labs)
- Splashtop: installation on a Mac (video)
- Splashtop: using the app to connect to C-9 and open Maya (video)
- Splashtop: saving a Maya file (video)
- Splashtop: using the file transfer button (video)
- Splashtop: emailing a file to yourself (video)
- Splashtop: logging off properly (video)
Additional Resources
- Student Emergency Grant (Help for Computer Technology Purchases)
- Collegebuys.org (Purchase deeply discounted Computer Hardware/Software )
Contact Us
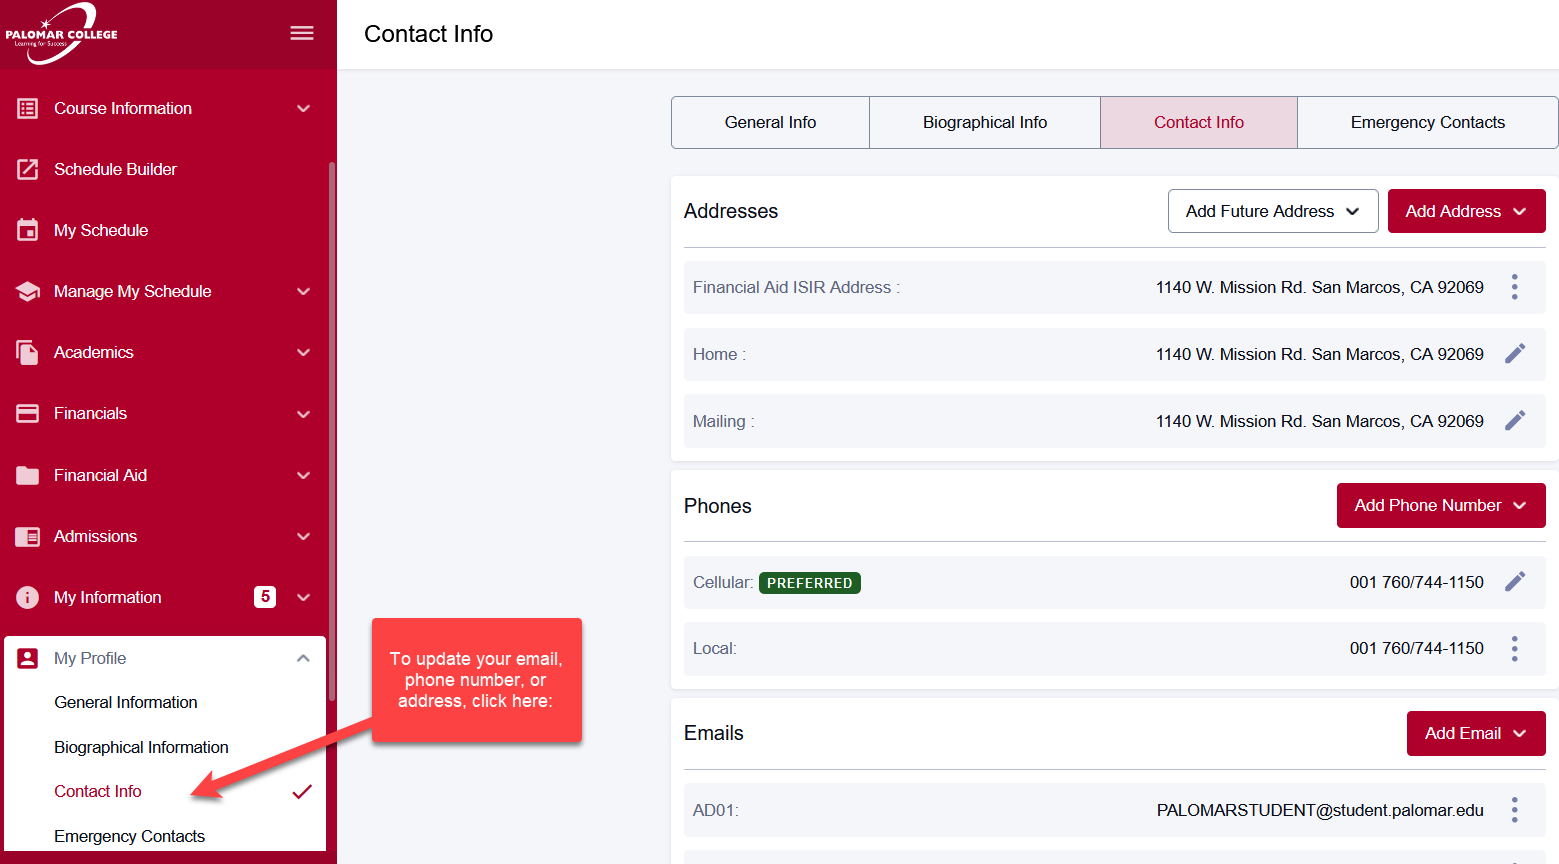
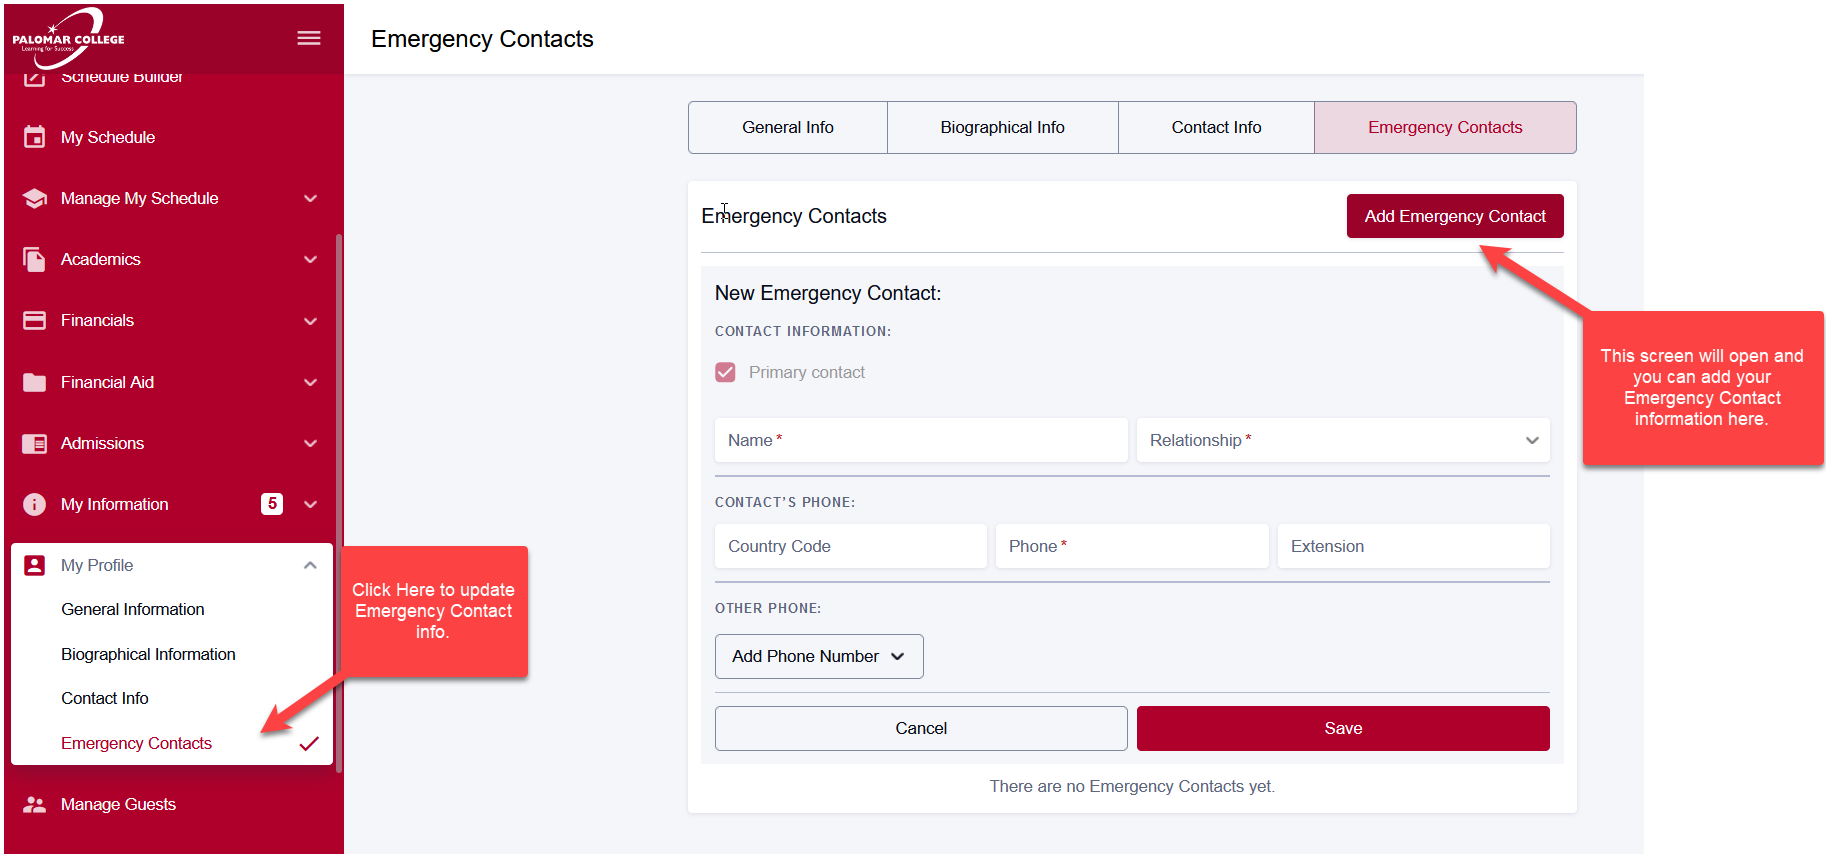
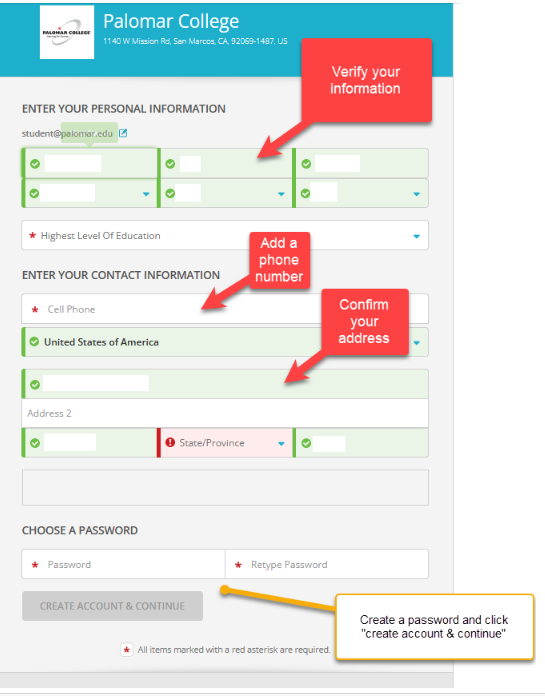
A: Follow the steps below.
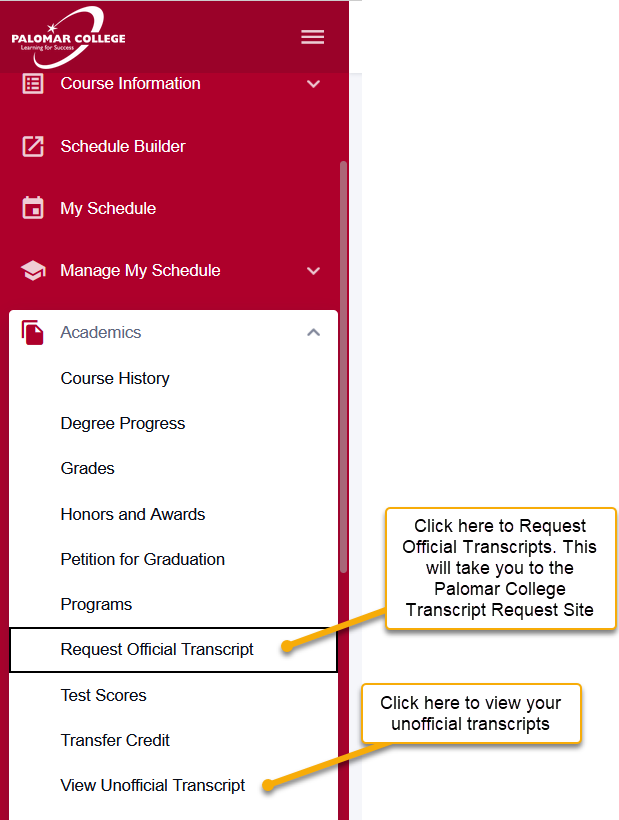
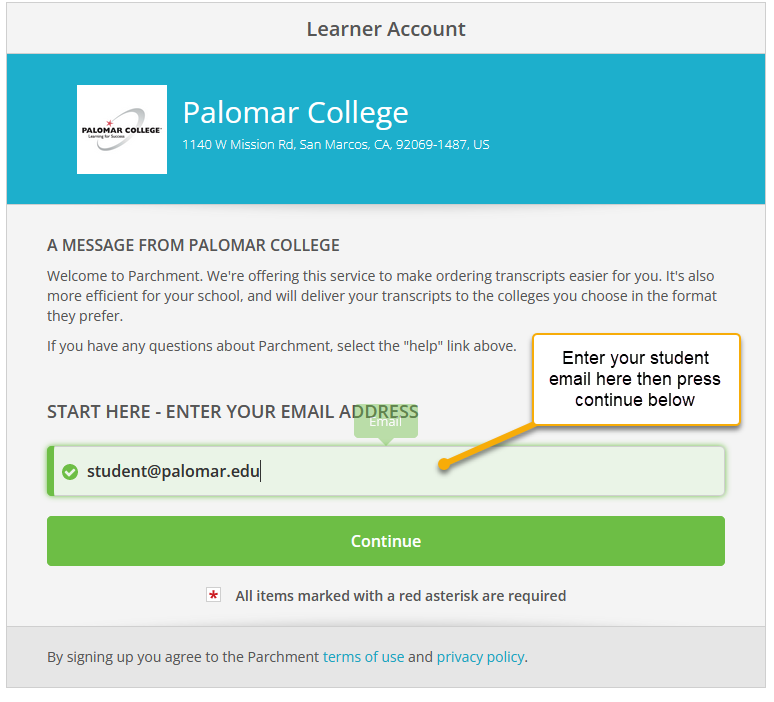
A: To order your Official Transcripts follow the steps below.
A: You will find your Math and English Placement under Academics drop-down by selecting Test Scores.
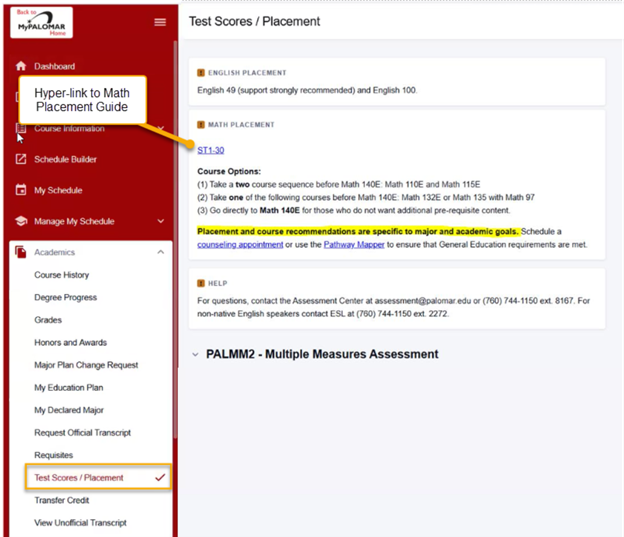
Assessment Center is assessment@palomar.edu or (760) 744-1150 ext. 8167.
For non-native English speakers please contact ESL at (760) 744-1150 ext. 2272
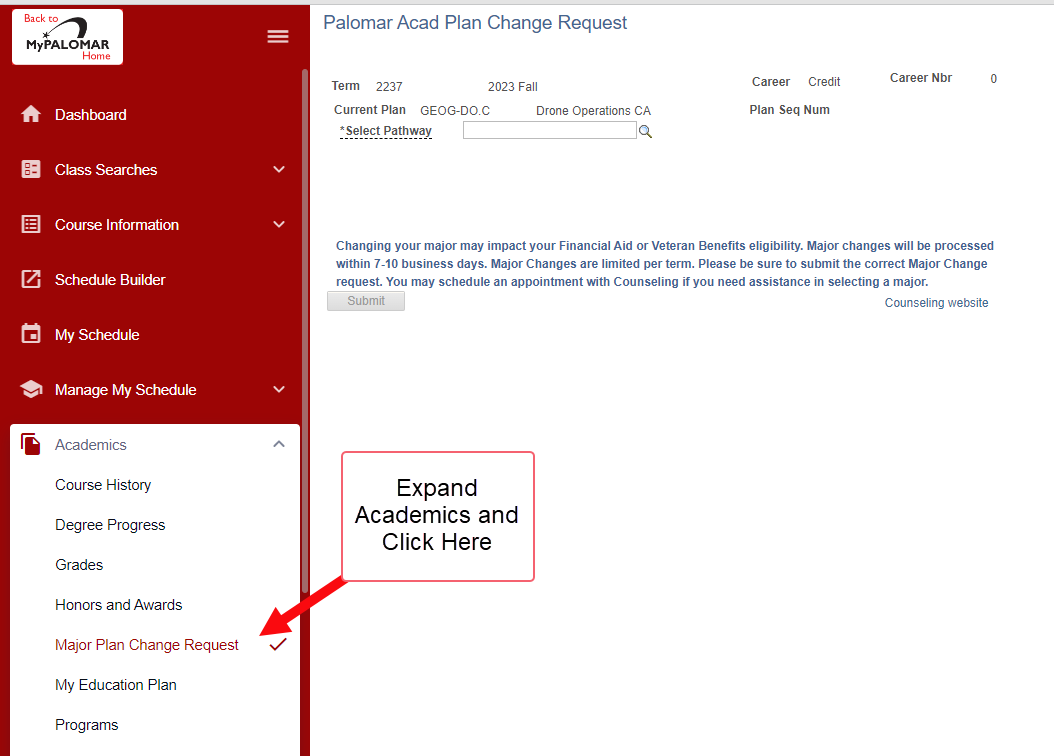
A: Under the Academics tab on the left navigation page you will see the Major Plan Change Request link.
A: The below instructions are for navigating to the Palomar Promise navigation in the New MyPalomar.
Learn more about the Palomar Promise program.
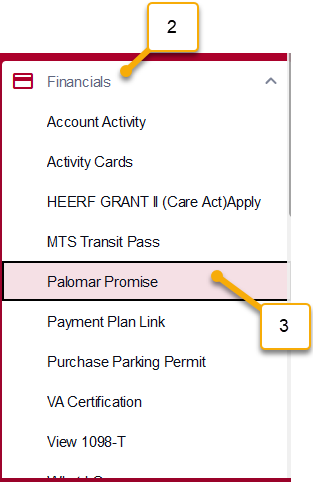
Step 3: If you are eligible for the Palomar Promise program, you will see an application link to apply. If you do not meet the requirements to apply, you will see a message that you are not eligible.
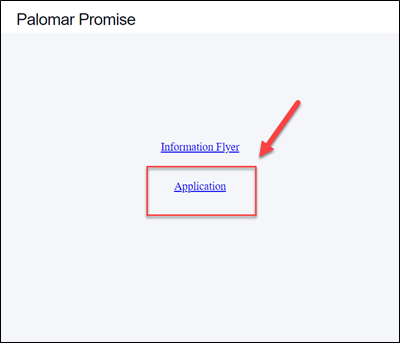
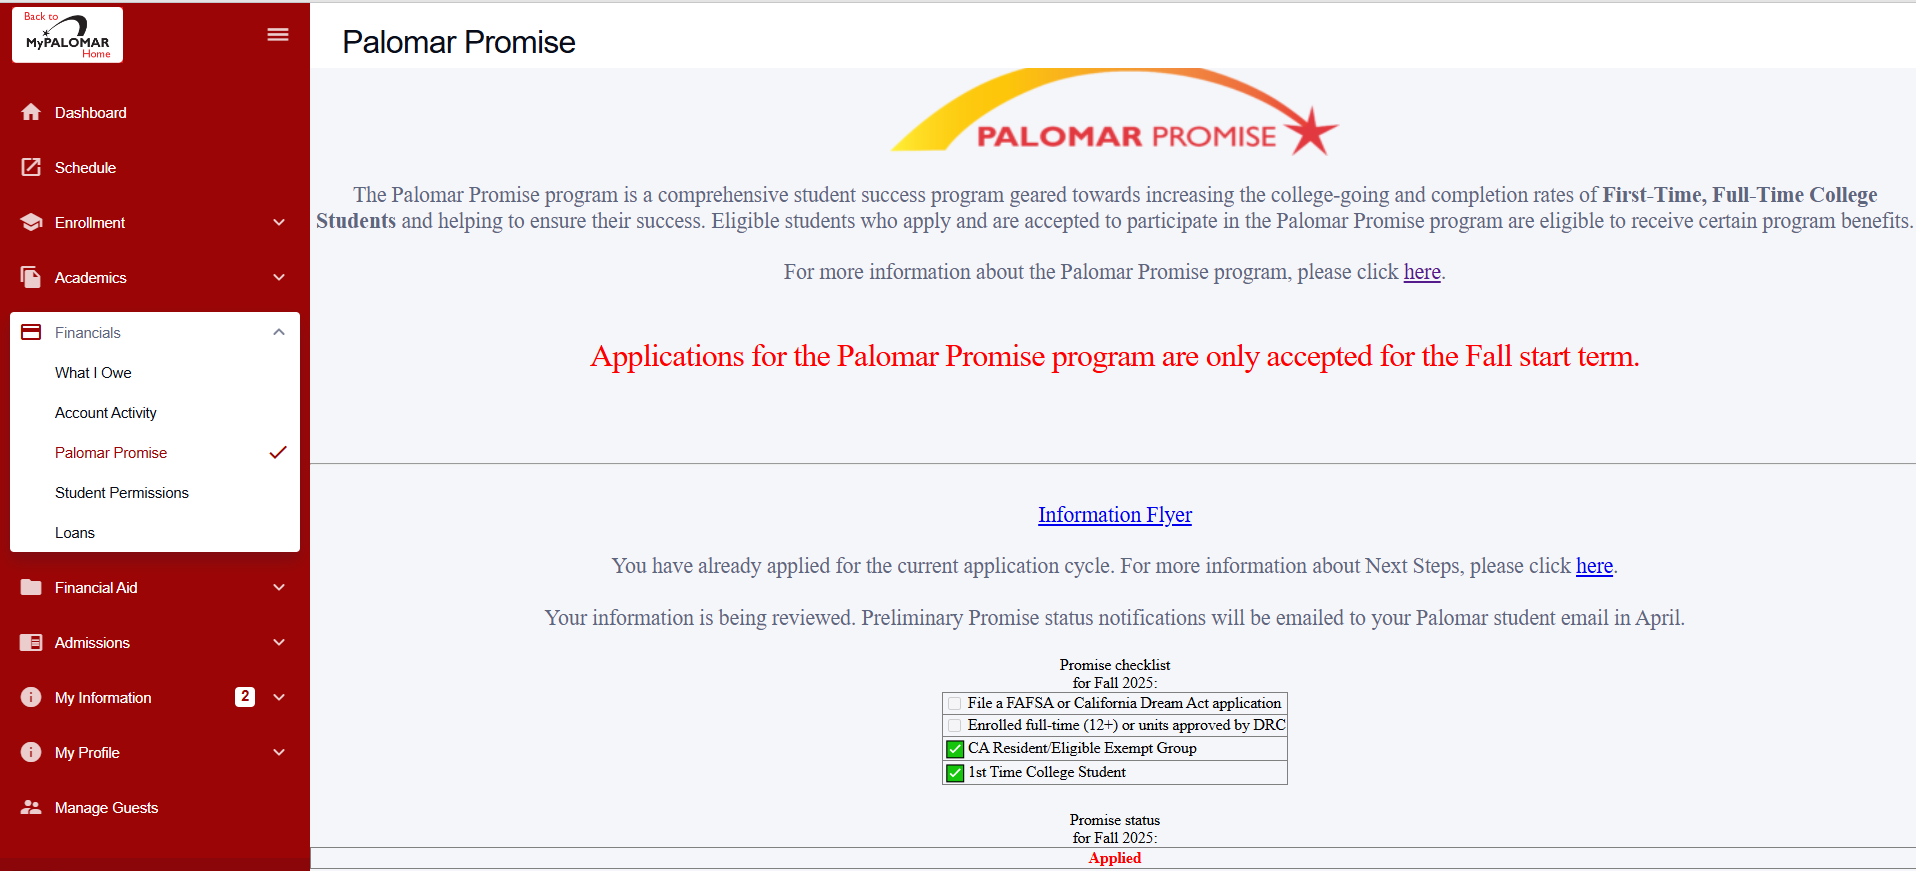
Be sure to check your Palomar student email frequently for information regarding your Promise application status and important updates/deadlines.
For Questions about the next steps, visit the Palomar Promise – Next Step website
Palomar College, San Marcos Campus Location: Teaching & Learning Center, San Marcos (TLC-100) 1140 W. Mission Road, San Marcos, CA 92069
Email: promise@palomar.edu Phone: (760) 744-1150, ext. 3931
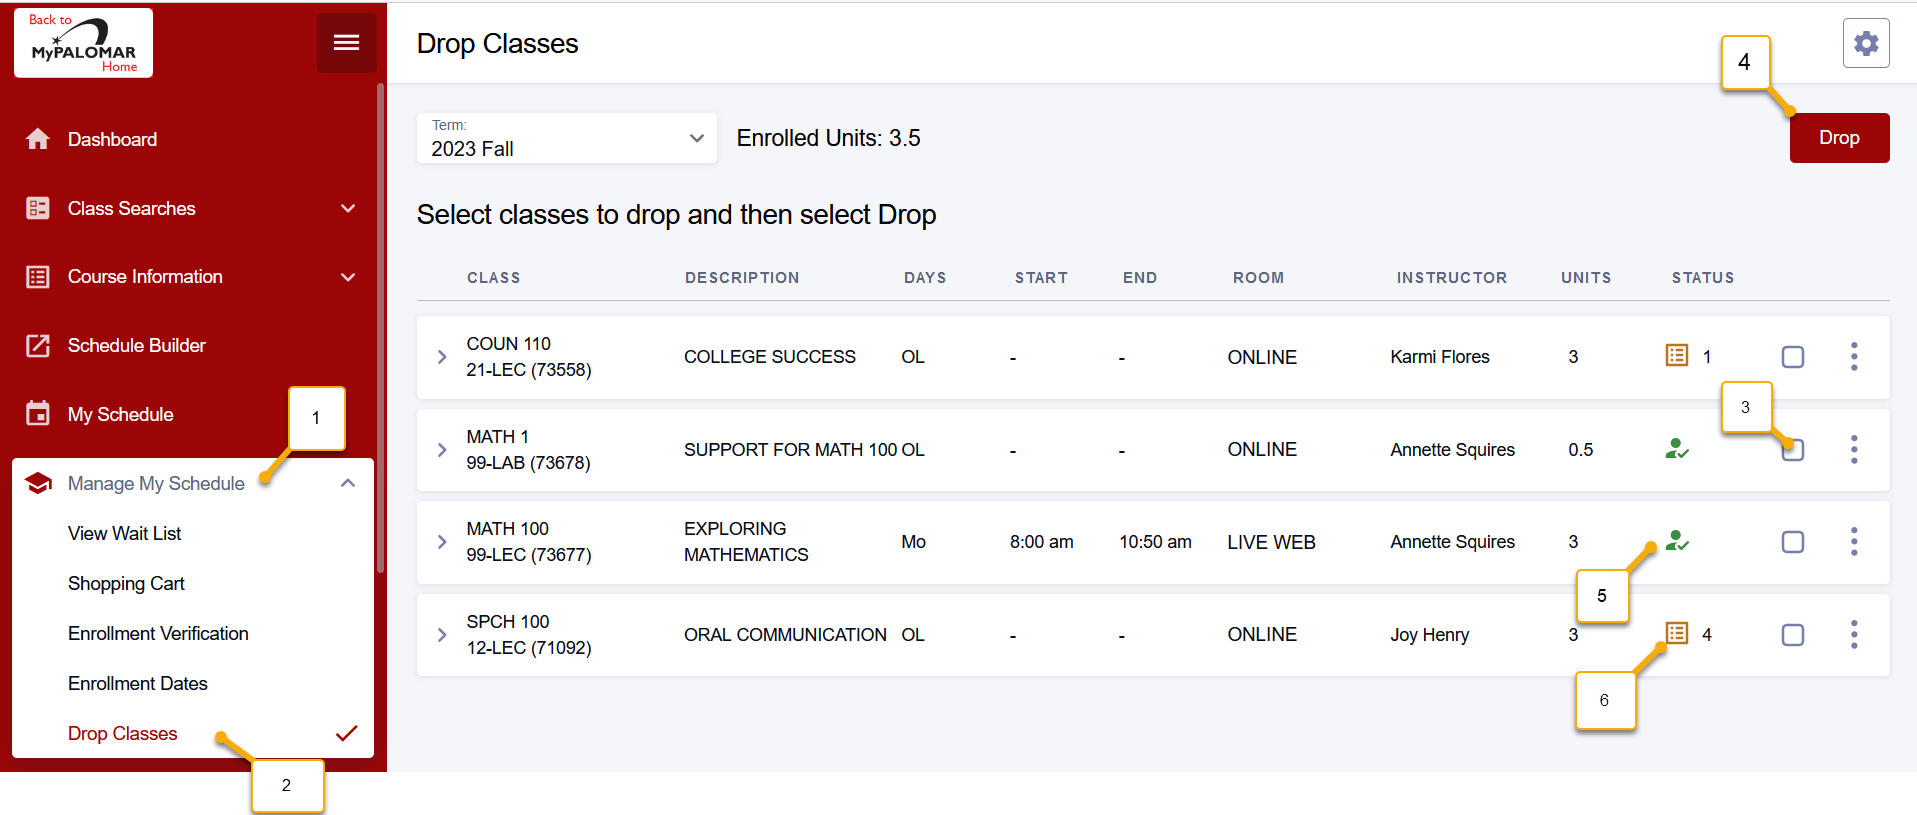
A: After you are enrolled in a course and would like to drop a course, please follow these steps.
(Please be aware of deadlines associated with the last day to drop, and any deadlines associated with a refund, or to receive a “W.”)
- Click the Manage My Schedule Dropdown
- Select drop classes
- Check the box for the class you want to drop (if you have linked classes you will need to drop all the courses that are linked together
- Select Drop
- This orange-lined icon is a waitlist icon (in this example the student is in position 4 on the waitlist)
- This green person outline with a green check status is enrolled