Generating Boilerplate Content within Word

Perhaps you’ve been in this situation: Need to work on the formatting of a document, but the author hasn’t provided the text yet. What you really need is some sample text in your Word document, but you don’t want to go out and find some text online, possibly for fear of getting interested in some new topic. (Or is that just me?)

Microsoft Word actually has a function just for this purpose. Actually, I lie, it has two functions just for this purpose.

To see this in action, fire up Word, open up a new document and type (without the quote marks, of course) “=lorem(5,8)” and then hit Enter. You should be looking at five paragraphs of eight sentences each, filled with that psuedo-Latin “Lorem ipsum” text. Naturally you can change the numbers in that, with the first controlling number of paragraphs and the second controlling number of sentences, so “=lorem(71,3)” would result in many short paragraphs.

But what if you want some boilerplate text, but want something that will be readable English? In that case, type in “=rand(5,3)” (or whatever numbers of paragraphs and sentences you want), and hit Enter. Text will appear, drawn from Microsoft help files. (At one time it used to iterate “The quick brown fox jumped over the lazy dog.” But this changed to somewhat meaningful text around Word 2007.)

So there you have it, two functions to generate some throw-away text. Now you can get to testing font styles, preparing the locations of images, anything else to beautify the document, all without waiting for the author to get the text to you.

Getting Loopy with PowerPoint 2013

If your classes go anything like my workshops do, then you seldom start right on time. I always hate “wasting time” out of my scheduled class time, and wish I could do something to make that time more useful.

I’d really like to have something like the pre-previews content that movie theaters run; you know, the stuff with trivia games, ads, and the like that play before the house lights dim. There’s always an array of things to tell my learners about, and having that showing on the classroom projector while I do other things until class starts seems ideal.

PowerPoint to the rescue!

If you prepare a series of informational slides (when the next exam is, when the drop deadline is, what sort of cookies you prefer, etc.) it is possible to configure your slides to automatically advance, and when the end of the presentation hits, to loop around and play them all again. The two key elements are “Transitions” and “Loop Continuously.”

  1. First, make sure you don’t have any animations that are set to run “On Click.” If you do, those animations will not trigger.
  2. Next, for each slide, decide how long you want it to display on the screen.
  3. Move to the first slide, and click the Transitions tab.
    Transitions AdvanceSlide
  4. At the right side of the ribbon, in the “Advance Slide” area, uncheck “On Mouse Click”, check “After:” and set the time. That is minutes, seconds, and fractions of a second, so if you want the slide there for 15 seconds it must be set to 00:15.00.
  5. Repeat steps 3 and 4 on each slide of your presentation. Each may have a completely different time set.
  6. Next, go to the Slideshow tab, and click the “Set Up Slide Show” button near the left of the ribbon.
    Transitions Set Up Slide Show
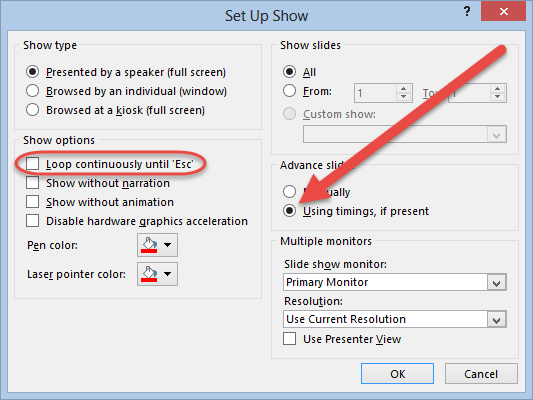
  7. On the “Set Up Show” dialog, check the box for “Loop continuously until ‘Esc'”, and be sure the “Advance slides” control is set to “Using timings, if present.” That way, all those times you set will actually be used.
    Set Up Show Dialog
  8. Now you can save your show, as you normally would, in the PPTX format.

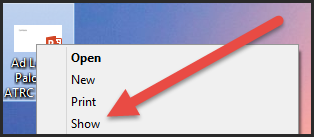
Technically you’re all done now (although you’ll want to test things BEFORE going into the classroom). But to trigger your presentation, all you need to do is right-click the PPTX file, and choose “Show” on the context menu. That should cause your presentation to open immediately into the slideshow mode, so all you would need to do then is sit back, and watch your presentation run itself.

PPTX Menu ShowNow, if you’re the type who wants to use animations, even in these slides, that can be done. The trick is to make sure all your animations are set to “With previous” or “After previous,” and that none use “On Click.” Of course, the more complex your animations, the more you’ll want to test and be sure everything works as expected.

So there you have it: Self presenting slides. My plan is to start such a presentation Showing a few minutes prior to my next in-person session, and see if anyone pays attention. When you give it a try, let me know how your experience goes!

Inserting Links Into WordPress Pages and Posts

Links to webpages and files are a basic part of the web. In fact, without them it wouldn’t be much of a ‘web’. The WordPress content editor makes it easy to insert new links and edit existing ones. There are three types of links that will commonly be inserted:

  • Internal pages or posts – These are links to pages or posts within your own WordPress site. WordPress makes it really easy to choose which existing page or post to link to.
  • External websites or files – Anything that is outside of your WordPress site is an an external link. WordPress allows you to specify a URL for any external content.
  • Internal files – The WordPress content editor makes it really easy to upload a file and link to it, all in one simple interface.
The following video demonstrates how to insert all three types of links:

How to Disable Comments in WordPress

One of the most frequently asked questions about using WordPress for managing a website is:

How do I disable the comments on a page or post?

While the comment system in WordPress works really well and can be a great way to get feedback, there are many instances when comments from site visitors are not necessary or appropriate. By default, the option for a site visitor to leave a comment is on. It is not obvious how to turn comments off when creating or editing a page because the option is initially hidden.

The following short video shows how to disable comments on a page or post and how to change the default setting so that comments are off when creating new content.

Creating New Posts in WordPress

After obtaining a new WordPress site, one of the most important tasks to learn is how to create new posts. Posts can be used in many different ways within WordPress, but their primary use is as discrete entries in a blog. The home page of a new WordPress site is what is referred to as the posts page. Any page in a WordPress site can be designated as the posts page, but the home page is the default.

Posts are a great way to get fresh information online, keeping your site from appearing stale. The beauty of WordPress is that posts are quick and easy to create.

The following video demonstrates how to create a new post and talks about many of the options when doing so: